
6-Day Sweetheart Blanket
6-Day Sweetheart Blanket
A variation of the classic crochet pattern the 6-Day Kid Blanket
by Betty McKnit
Striping “Australian Confetti Effect” created by OldBoiler Robo.
Be sure to try the 6-Day Sweetheart Star Blanket
This pattern contains affiliate links. If you click these links and buy something on the page they take you to, I may, at no additional cost to you, earn a commission. I only affiliate with products and companies I feel good about. Thank you for your support!
Introduction
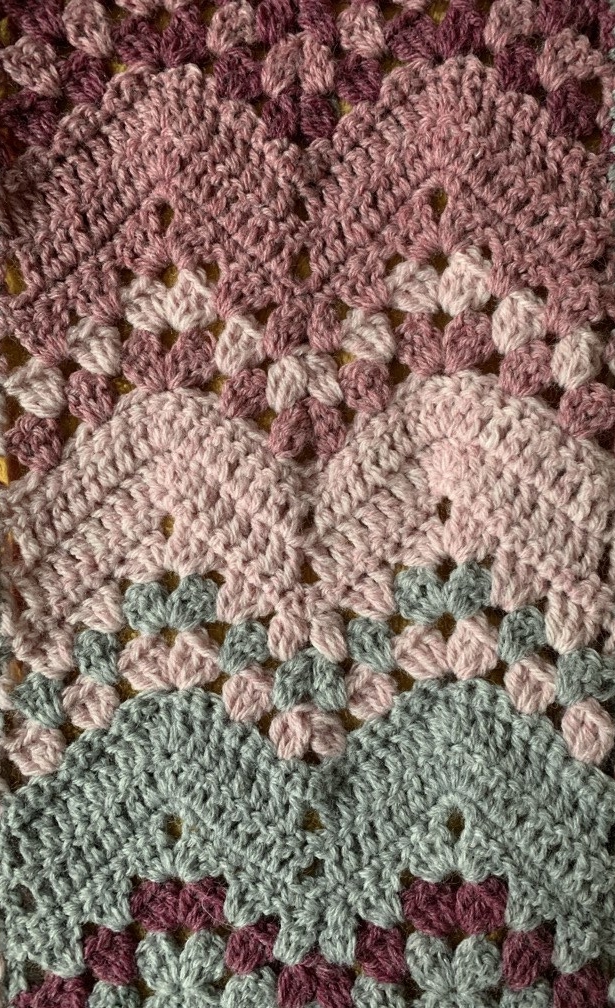
This blanket is a variation on the classic 6-Day Kid Blanket. It utilizes the striping effect known as Australian Confetti, created by Glynis Robertson, aka Oldboiler Robo. Glynis was inspired by the crochet pattern Confetti Waves designed Kate Rowell.
The original Classic 6-Day Kid Blanket (6DKB) was written for a toddler-sized blanket made with chunky weight yarn, and can easily be made in six days.
This variation on the 6DKB uses the very same stitches, but is larger than the original and may take longer than six days to make. Give yourself about two weeks of working an hour or two every day to complete this pattern variation.
How to Resize
This pattern creates a throw-sized napping blanket. No options for resizing are offered in this pattern.
If you would like make this blanket in a different size, please see the original 6-Day Kid Blanket pattern and 6DKB Resize Video.
First timers
If this is your first time making a 6-Day Kid Blanket, before you begin, I suggest you make a swatch on 37 chains while following along with my video tutorials on my YouTube Channel. The first few rows are a little tricky and you’ll sidestep common mistakes by swatching along with my tutorials.
Details:
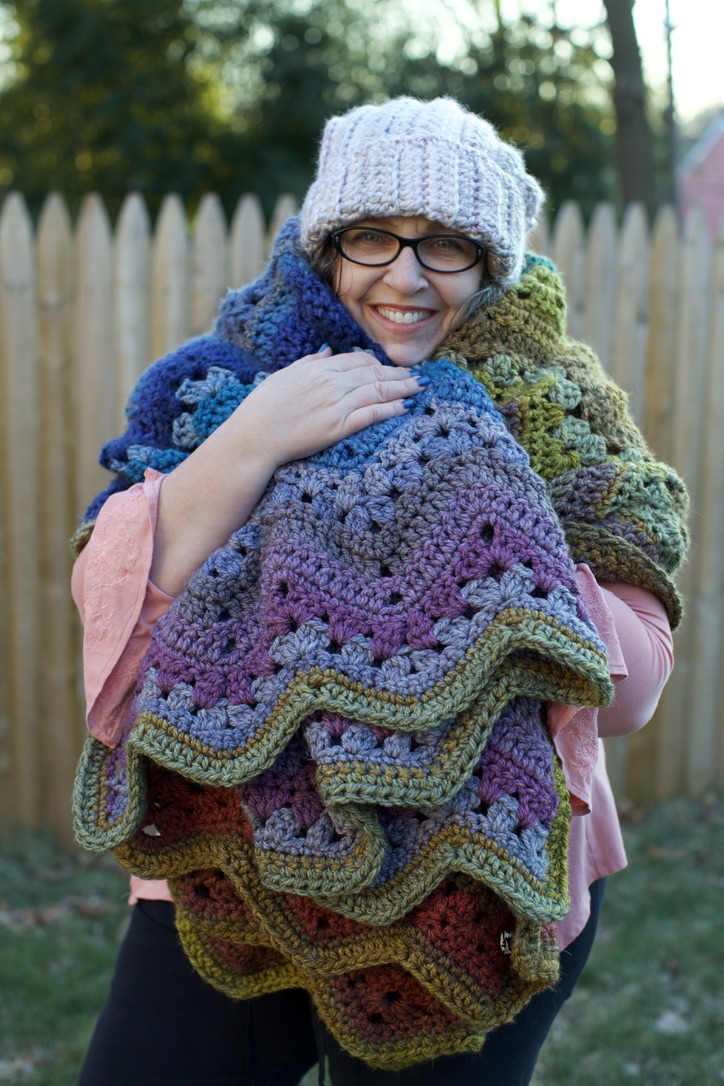
Finished Size: 50” x 70” (throw size)
Skill Level: Easy
Yarn: 4000 yards total of #4 worsted weight yarn in four colors
Shown in Lion Brand Woolease, 1000 yards (5 skeins) of each of the following colors:
Color A: Grey Heather
Color B: Blush Heather
Colors C: Rose Heather
Color D: Dark Rose heather
Hook: Furls Odyssey I/5.5mm hook
Abbreviations:
ch: chain
dc: double crochet
dc3tog: (NOT TO BE CONFUSED WITH dec dc3tog).
Work dc3tog into one stitch – not over three stitches
[yarn over, pull up a loop, pull through two loops] 3 times. Yarn over, and pull through all 4 loops on the hook. (Be sure to pull up a loop in the same stitch every time.) dc3tog complete.
rep: repeat
sc: single crochet
sk: skip
sp(s): space(s)
Side edges:
Some crocheters have had issues with the side edges of their blankets curling. Here are some steps you can take to help alleviate this:
- ch 4 at the beginning of the row where the instructions say to ch 3. This is something you should try in your swatch, as some crocheters with tighter tension find that they really do not need that extra stitch. Others do fine without it.
- Replace the dc at the end of each row with extended double crochet (edc)
Keep in mind when adding additional stitches on the edge you may need to skip stitches when working along the sides to get your edges to lie flat. There is no exact formula for how many sc to work into the edge. Use your judgement and lay it down often and check it as you are working.
- When working the last stitch of the row, insert the hook from back to front, instead of from front to back.
- Work an edge into the turning chains and sc/dc stitches on the sides of the work as described at the end of this pattern, rather than into the spaces.
- Wash your blanket once it is complete, and lay it out flat to dry, gently stretching and shaping the edges.
Pattern:
With Color A, ch 207
Row 1: (RS) 1 sc into 2nd ch from hook, 1 sc into each ch to end.
Turn
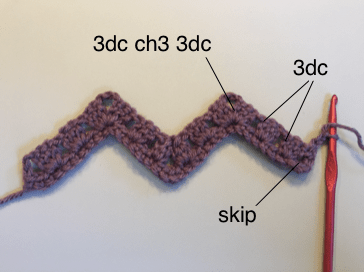 Row 2: ch 3, sk first 3 sc (the sc on the end of the row, the one below your turning chain counts as 1)
[3dc in next sc, sk next 2 sc] twice, [3 dc, ch 3, 3 dc] into next sc
*sk next 2 sc, 3dc into next sc, sk next 2 sc, dc3tog
sk next 4 sc, dc3tog, sk next 2 sc, 3 dc in next sc, sk next 2 sc
[ 3 dc, ch3, 3 dc] into next sc; rep from * to last 9 sc
sk next 2 sc [3 dc into next sc, sk next 2 sc] twice, 1 dc into last sc.
Turn
Change to Color D
When changing colors, pull the new color through the last two loops of the last stitch of the previous color. Break the yarn for the old color.
Row 3: ch 3, sk sp between turning ch and next 3-dc group, 3 dc into each of next 2 sp
[3dc, ch3, 3dc] into next ch-3 sp
*3 dc into next sp, dc3tog into next sp
sk next sp, dc3tog into next sp, 3 dc into next sp, [3dc, ch3, 3dc] into next ch- 3 sp
rep from * to last 3 sps, 3 dc into each of next 2 sps
1 dc into sp between last 3 dc group and turning ch.
Turn
Change back to Color A and repeat Row 3. Continue in Color A through Row 7.
Turn
Row 4: ch 1, sc into first dc of the row (the one right below your turning chain)
sk next dc, 1 sc into each of next 8 dc
*3 sc into next ch 3 sp, 1 sc into each of next 14 sts
repeat from * to last ch-3 sp, 3 sc into last ch-3 sp
1 sc into each of next 8 dc, sk next dc, 1 sc into 3rd st of ch 3.
Turn
Row 5: Ch 3, sk first 2 sc of the row below (the sc your turning chain is coming out of counts as the first one). 1 dc into each of next 8 sc
*3 dc into next sc (you should be working these into the center stitch of the 3 sc. If not, you may have skipped incorrectly in the beginning of the row.) 1 dc into each of next 7 sc
sk next 2 sc, 1 dc into each of next 7 sc
rep from * to last 11 sc, 3 dc into next sc, 1 dc into each of next 8 sc
sk next 2 sc, 1 dc into the turning chain from the row below.
Turn
Row 6: Ch 3, sk first 2 dc in the row below (the dc below your turning chain counts as 1)
1 dc into each of next 8 dc
*3 dc into next dc (you should be working into center stitch of 3 dc)
1 dc into each of next 7 dc, sk next 2 dc, 1 dc into each of next 7 dc
rep from * to last 10 dc
3 dc into next dc, 1 dc into each of next 8 dc, sk last dc, 1 dc into 3rd st of ch 3, turn.
Row 7: Ch 1, sc into first dc (the same one the turning chain is coming out of), sk 1 dc
1 sc into each dc along row to last dc, sk last dc, 1 sc into 3rd ch of ch 3, turn.
Repeat rows 2-7 as follows:
Change to Color B and work row 2, change back to Color A for row 3, Change back to Color B and repeat row 3, and work rows 4-7 in Color B.
Continue the sequence.
Change to Color C and work row 2, change back to Color B for row 3, Change to Color C and repeat row 3, and continue working rows 4-7 in Color C.
Repeat the above sequence with Color D.
Continue the sequence of colors A, B, C, D repeating rows 2-7, working row 3 twice, first with the previous color in the sequence, and the second time with the current color, and going through the entire sequence of four colors four times. (16 stripes total)
Repeat rows 2-4 once more as follows:
Change to Color A, work row 2, Change to Color D, work row 3, change back to Color A and work rows 3 and 4. The blanket ends on Row 4. Do not fasten off.
Edging Row 1: Continuing with Color A, work a row of sc around the entire blanket, working (sc ch 2 sc) into each corner and into the points along and top and bottom of the blanket.
When working sc into the sides of the blanket, use the turning chains and the dc stitches as foundation chains, working under 2 threads of each stitch and leaving one thread below. This creates a beautiful even edge to the work. There is no exact formula for how many sc to work into the edge. Everyone’s tension is different, and you may have added additional chains or used edc to alleviate curling. Use your judgement and lay it down often and check it as you are working to ensure your edges are not pulling or flaring.
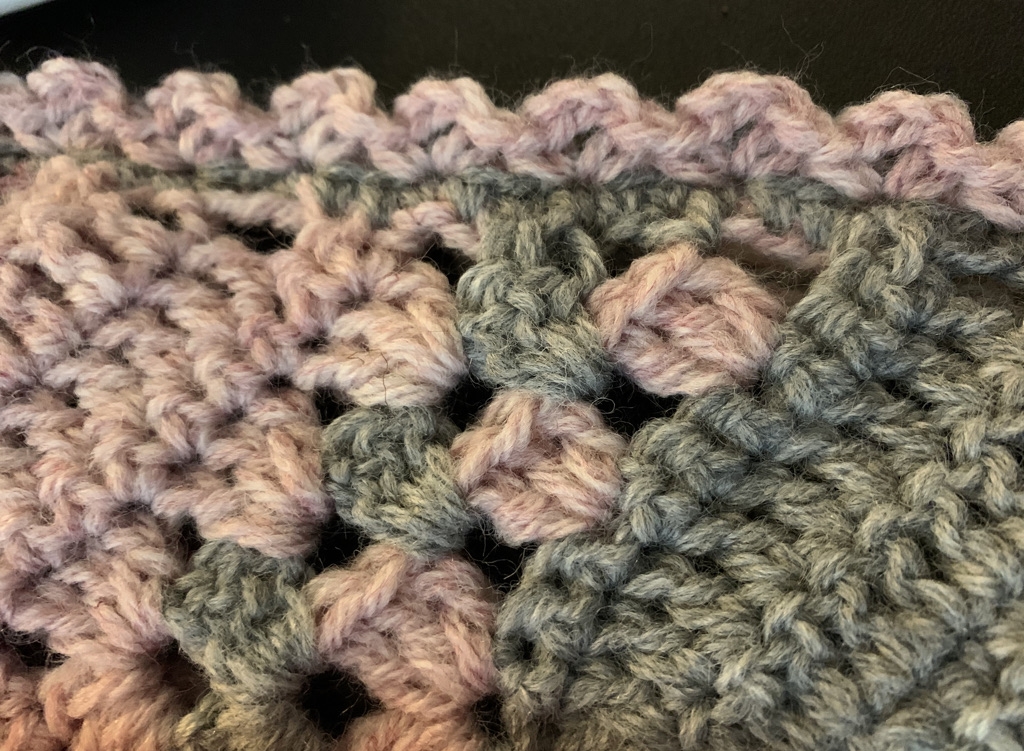
Edging Row 2: Join color B at any stitch on the side of the work, * (sc, ch2 sc) in same st, sk 2 repeat from * around. Adjust the number of stitches skipped so that (sc, ch 2, sc) lands on the points, and the sk 2 is worked in the valleys.
Fasten off. Weave in all ends.
Thank you to Glynis aka Oldboiler Robo, who came up with this beautiful and creative 6DKB variation, Australian Confetti.
Join us in the 6-Day Kid Blanket Facebook Group
Video tutorials available on Betty’s YouTube Channel
The stitch pattern is “Vivid Chevrons” #110 from 200 Ripple Stitch Patterns by Jan Eaton.
Reprinted with permission from Quarto Publishing.
This pattern contains affiliate links. If you click these links and buy something on the page they take you to, I may, at no additional cost to you, earn a commission. I only affiliate with products and companies I feel good about. Thank you for your support!
This pattern is the intellectual property of Betty McKnit/Beth Elliott, and it is protected by copyright. Publishing corrections, translations, written or video tutorials, or variations of this pattern, online or elsewhere, without written permission from the owner is a violation of copyright.
Betty McKnit (Beth McKee Elliott) is a knitting and crochet designer and teacher. She has been crocheting and knitting since she was a little girl and enjoys making and designing simple, versatile “go-to” projects that can be adapted for different yarns and sizes. Her most well-known design is the viral crochet pattern the 6-Day Kid Blanket. She promotes creativity as a joyful process and daily knitting/crochet as a mindfulness practice.
Sign up for my Newsletter
Join my Facebook Community
Become a Patron