6-Day Great Granny Blanket
6-Day Great Granny Blanket
A variation of the classic crochet pattern the
6-Day Kid Blanket by Betty McKnit
Introduction
I’ve been asked many times to design a granny square in the 6-Day Kid Blanket (6DKB) stitches. I came up with a basic square while trying to figure out something else. I hope you enjoy this square blanket in the style of 6-Day Crochet
This pattern is provided free with advertisements on this page. If you would like an ad-free .pdf, you can purchase one at the bottom of the page. The .pdf is the same as this pattern, with the exception of the ads.
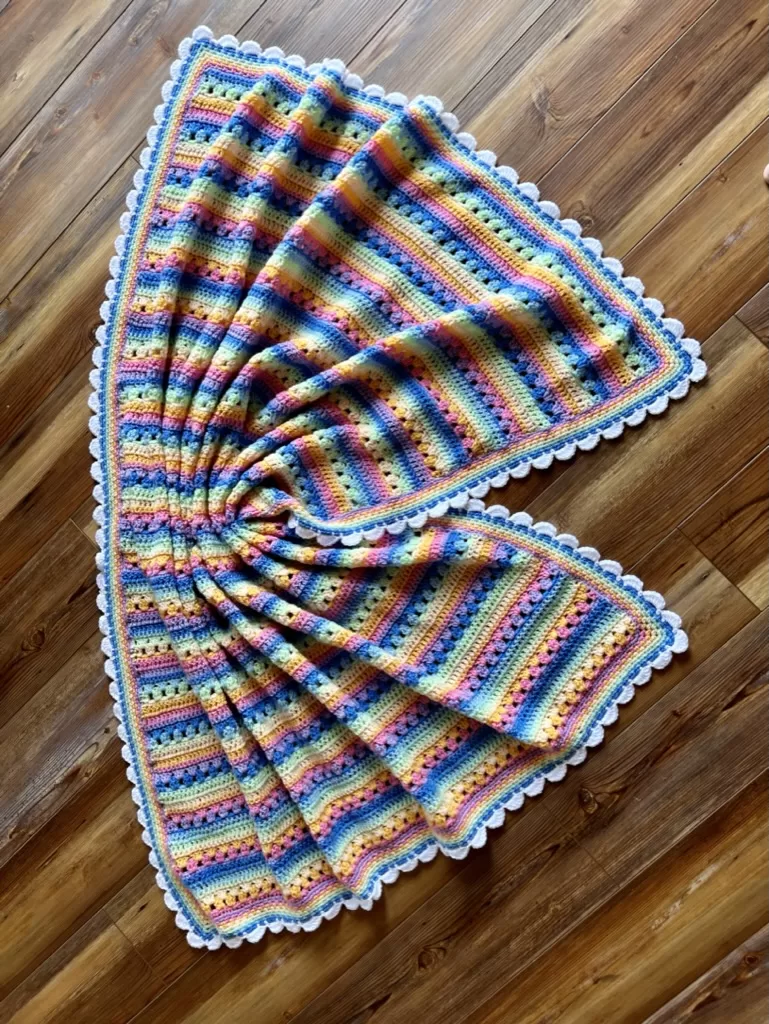
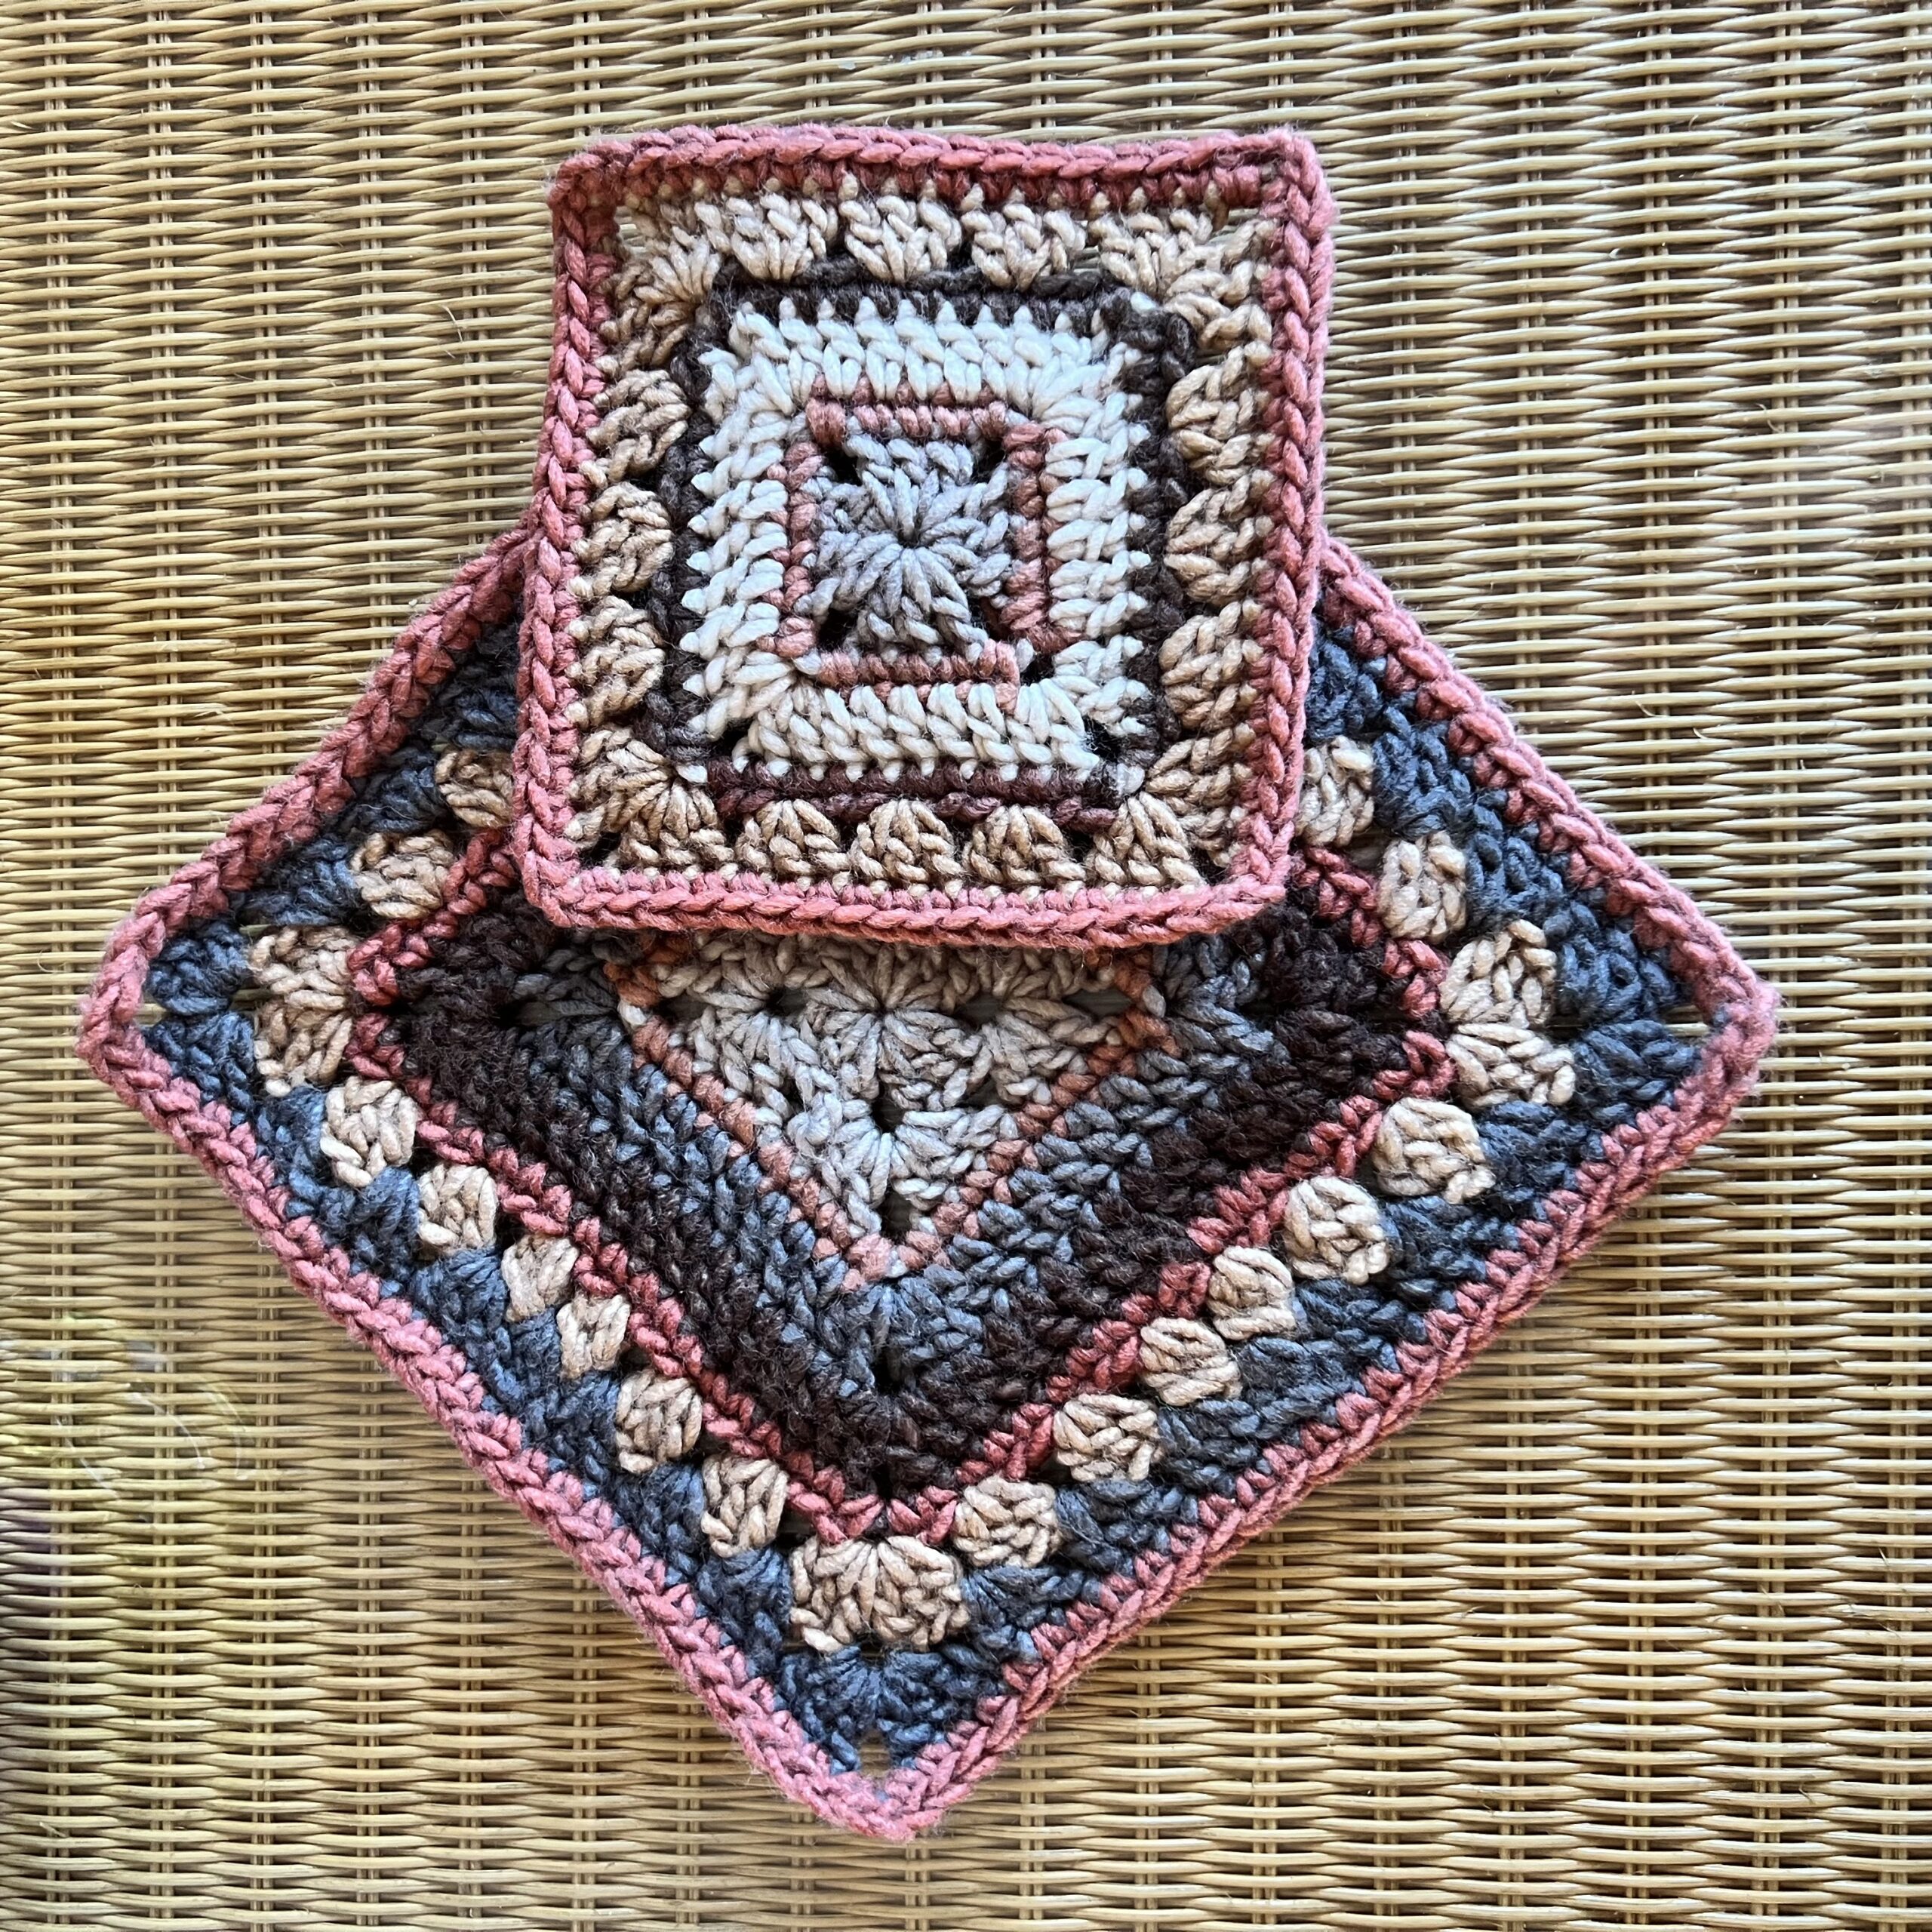
This pattern is for a continuous granny square blanket using the 6DKB Stitches. Start in the center and keep going until it’s as big as you like!
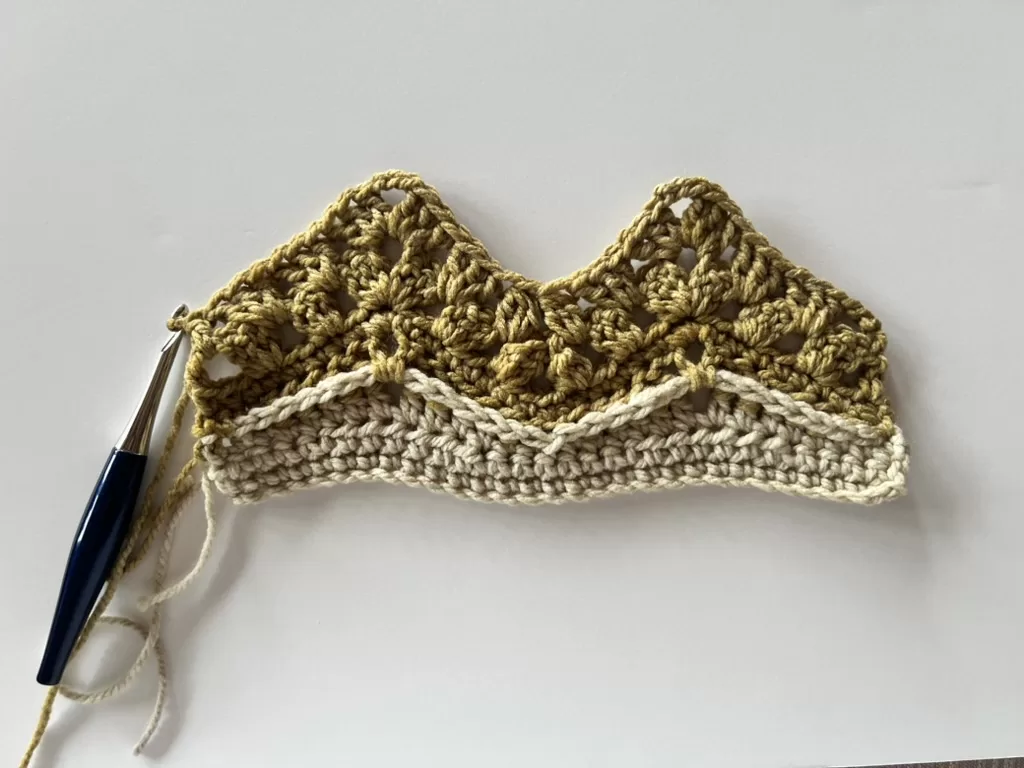
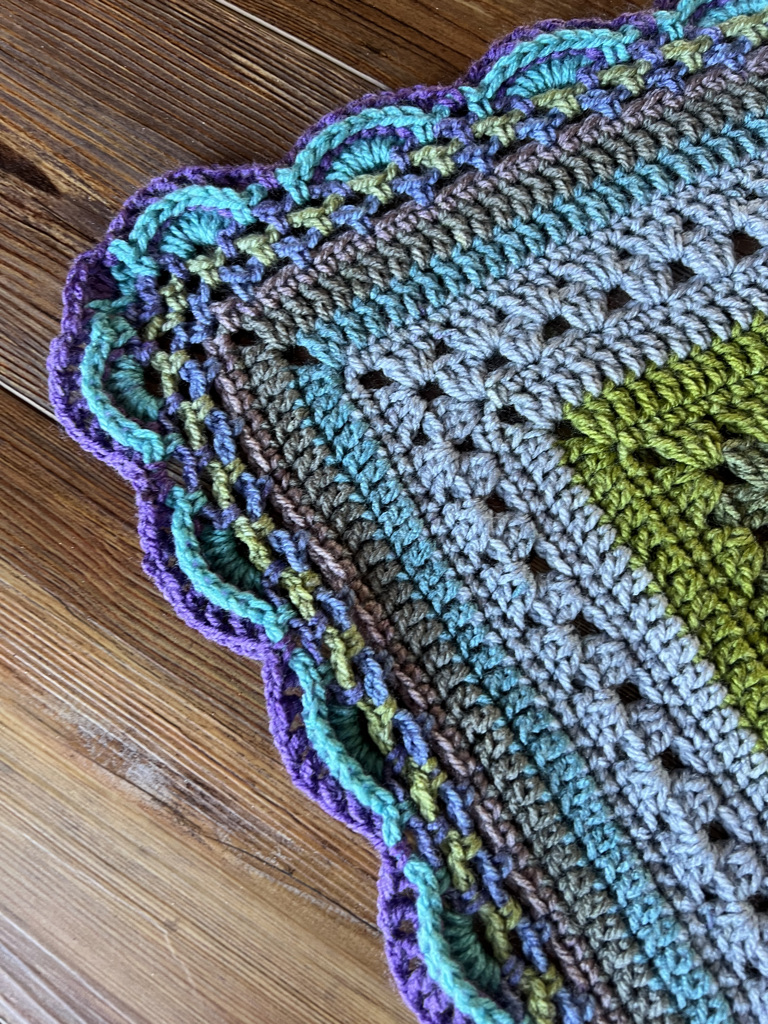
I’ve created a delicate, beautiful shell stitch border for this blanket as well, which gives the finished blanket a really polished, pretty look. Enjoy.
This page contains affiliate links. If you click these links and buy something on the page they take you to, I may, at no additional cost to you, earn a commission. I only affiliate with products and companies I feel good about. Thank you for your support!
Details
US Terminology
Skill Level: Easy
Gauge: 16 sc x 20 r on H-8 (5 mm) in yarn shown, however you may use any yarn.
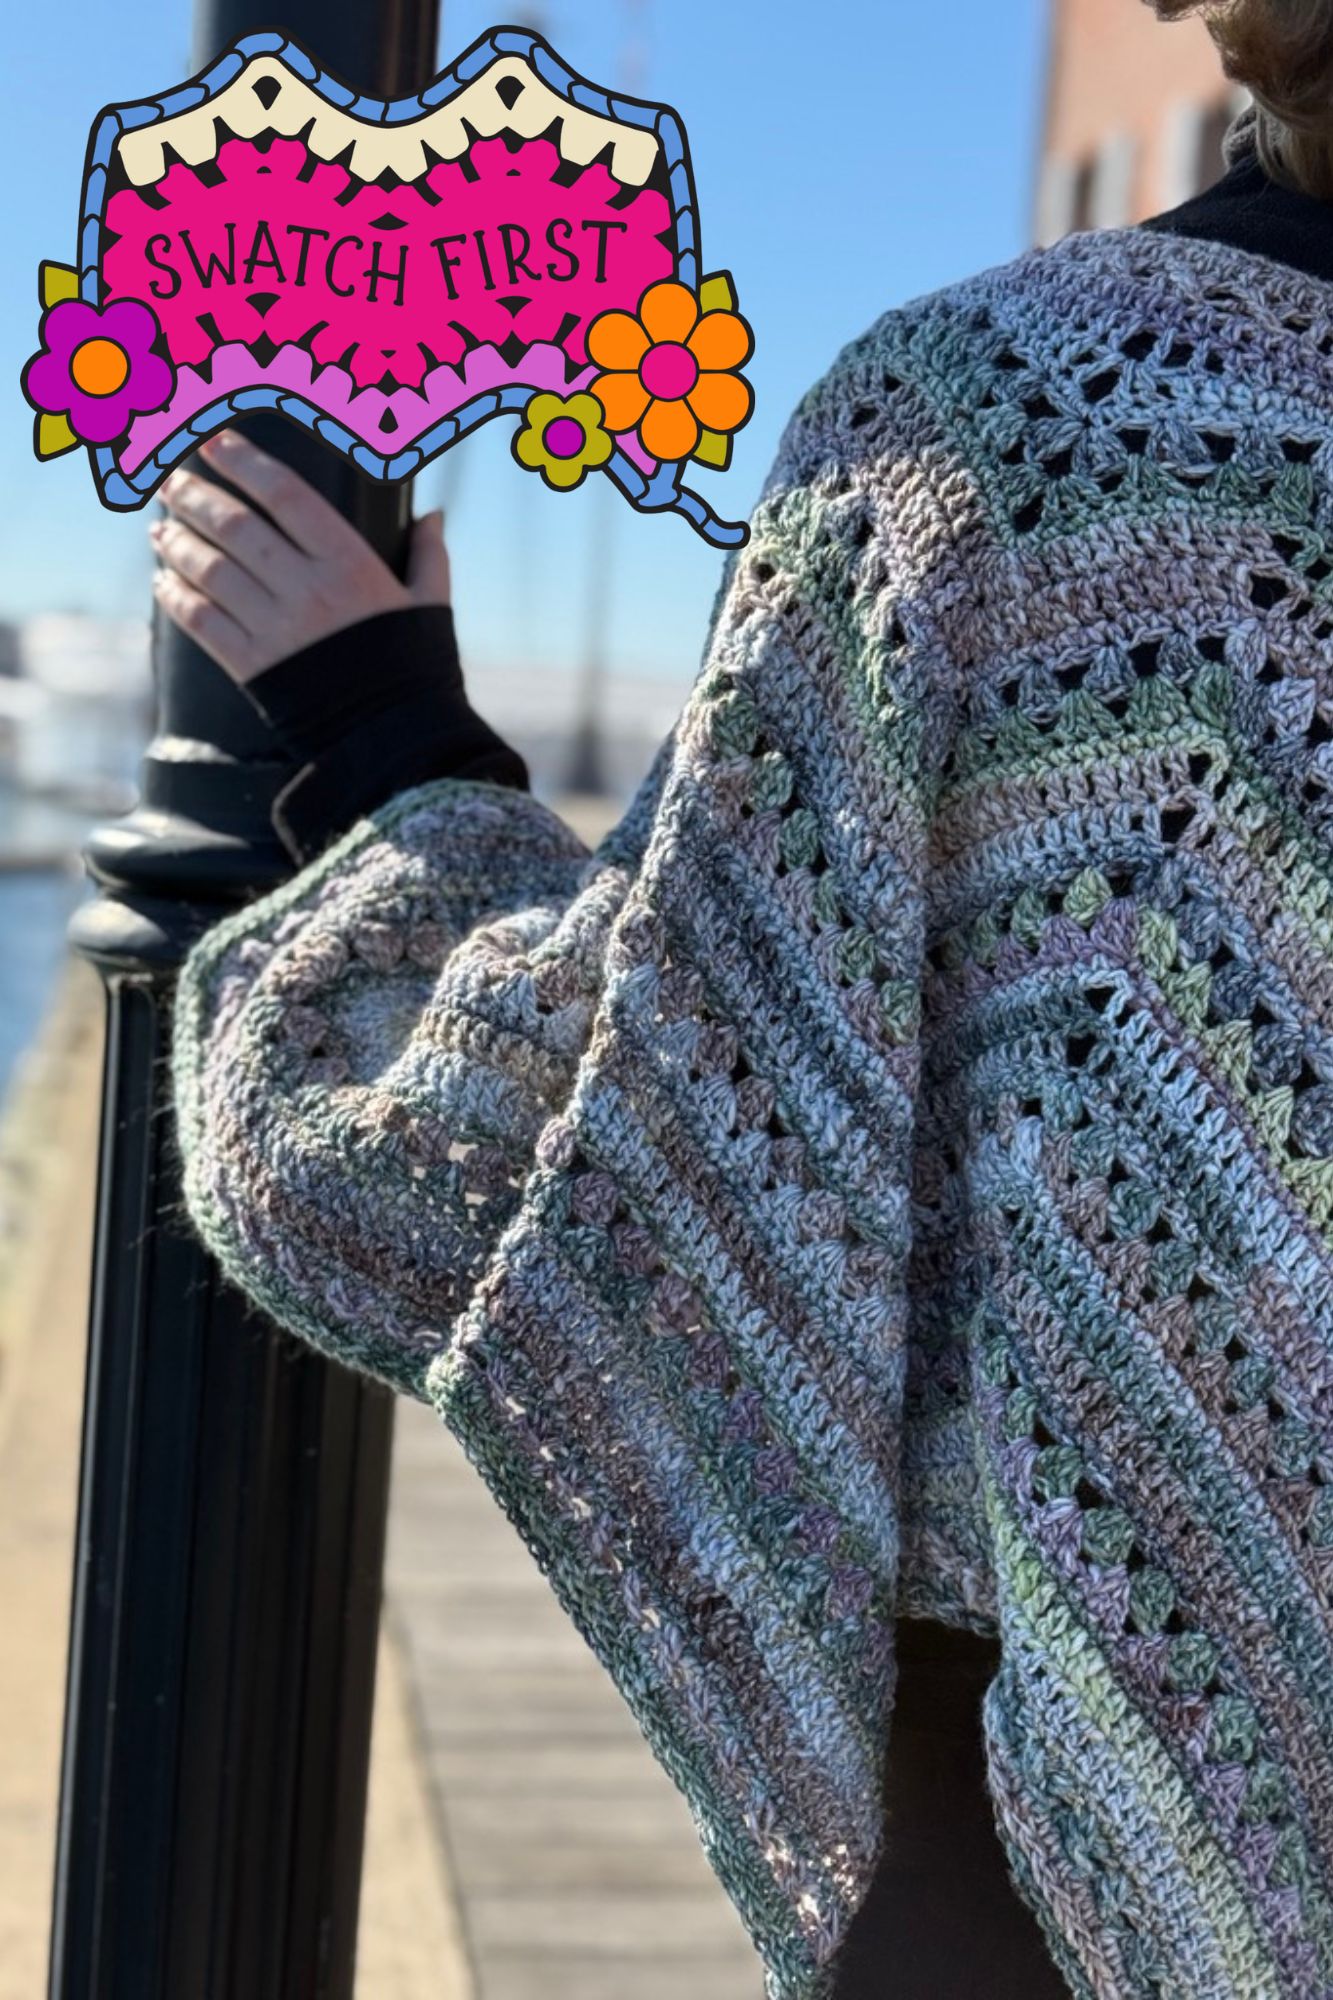
Finished Size: Blanket shown is 40” x 40” but you can easily vary to your liking.
| US terms abbreviation | UK terms abbreviation |
| single crochet sc | double crochet dc |
| half double crochet hdc | half treble crochet htr |
| double crochet dc | treble crochet tr |
Materials
Shown in Lion Brand Mandala (color changes controlled)
@ 2000 yards (I used approximately 3.5 cakes)
Yardage Estimates for other yarns
For DK or #3 weight yarn you will need approximately 2200 yards for a 40” baby blanket and 3000 yards for a 60” throw-sized blanket.
For Worsted or #4 weight yarn you will need approximately 2000 yards for a 40” baby blanket and 3400 yards for a 60” throw-sized blanket.
Hook: (5 mm)
This pattern can be made with any yarn and corresponding hook.
Cake Yarn
I love cake yarn so much, and there are so many great options to choose from. I feel that this blanket looks best with intentional color changes, as mid-row color changes highlight the jog at the join. If you don’t want to be bothered to control the colors for a large project, I suggest at least doing it for the first 8-10 rounds. You will need extra yardage if you are using cake yarn and controlling the colors.
About the row numbers:
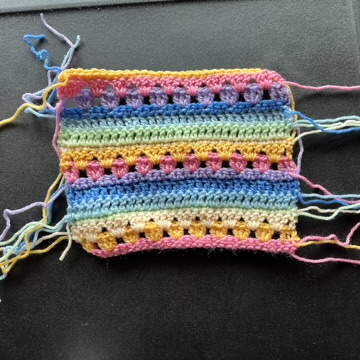
In order to provide consistency across all of the 6DKB pattern variations, I’ve numbered the rounds to correspond to the original 6-Day Kid Blanket pattern. The cluster rows are always Row or Round 2 and 3, the dc rows are always Row or Round 5 and 6, and the sc rows are always Row or Round 4 and 7. This makes it easy to adapt any pattern to the Snowflake Effect, Viral Stripes, Popsicle Effect, Aussie Confetti Effect, or the original Vivid Chevrons.
You will be guided to work the rows in the proper order; don’t let the numbers throw you off or overthink a change in the sequence. Trust the pattern!
Joining the rounds:
Take care when joining your new rounds not to create additional stitches, especially on the sc rounds. Use a stitch marker to mark the first st of each round to make it easier to join.
Changing Colors
Change colors by fastening off the old color and starting the new color with a standing stitch at the corresponding location on a different side of the work. By changing your new join location, your color changes will be less obvious, and your ends will be easier to weave in. I always weave in ends and I don’t recommend knots or simply working over ends.
Video
I worked through the entire project during a live event. You can find the replays on my YouTube channel (Link Below).
ch: chain
bpdc: back post double crochet
dc: double crochet
dc2tog: double crochet 2 together cluster
dc3tog: double crochet 3 together cluster
sc(s): single crochet(s)
sdc: standing double crochet
sl st: slip stitch
sp(s): space or spaces
ssc: standing single crochet
st(s): stitch(es)
Special Stitches:
- dc2tog (cluster) – this stitch is a cluster, not a decrease. It is worked as follows: yo, pull up a loop, pull through two loops, yo, pull up a loop IN THE SAME STITCH/SPACE, pull through two loops, yo and pull through all loops on the hook. dc2tog complete.
- dc3tog (cluster) – this stitch is a cluster, not a decrease. It is worked as follows: yo, pull up a loop, pull through two loops, *yo, pull up a loop IN THE SAME STITCH/SPACE, pull through two loops, repeat from *, yo and pull through all loops on the hook. dc3tog complete.
- standing stitches (sdc and dc) are worked with new yarn directly into the indicated stitch. You do not need to join new yarn with a slip stitch and then chain up to begin a new round with a new color. You can begin with a slip knot on your hook, or just start your new yarn without using a knot. Use your fingers to hold the yarn over against the hook while you work the stitch.
Other notes:
- Stitch counts in parentheses indicate stitch counts on subsequent repeats of the pattern.
- If you are changing colors on every round after the setup rounds, you can begin and end your rounds anywhere as long as you put all the stitches in their proper places and have the correct number of stitches on each side of the square.
- Ch 3 (counts as dc) can be used in place of sdc.
- Take care not to miss the first stitch after the corner chains. If you find your square is swirling, you may be missing that first stitch after the corners.
Begin
Ch 4, join with sl st to form a ring (magic loop not recommended).
Setup Round 1: working into starting ring, sdc (or ch 3 counts as 1 dc), ch 3, (3 dc, ch 3) 3x, 2 dc, join to sdc (or top of ch 3). (4 sets of 3 dc, 4 ch 3 sps)
Setup Round 2: sl st in ch 3 sp, sdc (or ch 3 counts as 1 dc), ch 3, 3 dc in ch 3 sp, (3 dc, ch 3, 3 dc) in each of next 3 sps, 2 dc in ch 3 sp. Join with sl st to starting sdc (or top of ch 3). (4 corners of 3 dc, ch 3, 3 dc)
Don’t let the change in sequence throw you off! Round 4 is next.
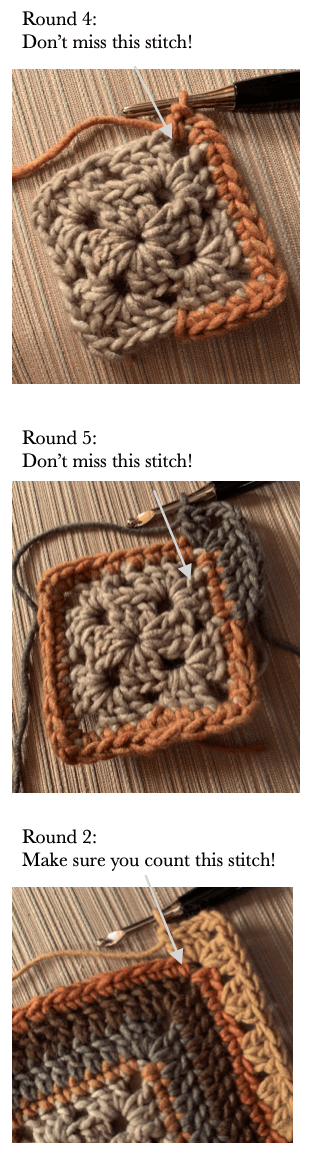
Round 4: sc in ch 3 sp, ch 2, sc in same sp, sc in each st around, work (sc, ch 2 sc) in each corner sp, sc in first sc. (8, 27, 45… sc per side including the first and last sc of the round)
Round 5: sl st into ch 2 sp, sdc, (ch 3, 2 dc) in same sp, dc in each st around, working (2 dc, ch 3, 2 dc) in corner ch 2 sps, dc in ch 2 sp, join with sl st to sdc. (12, 31, 49, 67… dc in each side)
Round 6: sl st into ch 3 sp, sdc, [ch 3, 2 dc] in same sp, dc in each st around, working [2 dc, ch 3, 2 dc] in corner ch 2 sps, dc in ch 2 sp, join with sl st to sdc. (16, 35, 53, 71… dc in each side)
Round 7: sc in ch 3 sp, (ch 2, sc) in same sp, sc in each st around, work [sc, ch 2 sc] in each corner sp, sc in first sc. (18, 37, 55, 73 … sc each side, including first and last st of the round)
Round 2: sl st in ch 2 sp, sdc, ch 3, 3 dc in same ch sp, *(sk 2, 3 dc in next st) 2 (5, 8, 11 …) x, sk 2, dc3tog, sk 1, dc3tog, (sk 2, 3 dc in next st) to corner, (3 dc, ch 3, 3 dc) in corner ch 3 sp, repeat from * to last corner, 2 dc in last corner ch 3 sp. Join to sdc.
Round 3: sl st into ch 3 sp, sdc, (ch 3, 3 dc) in ch 3 sp, *3 dc in next 3 (6, 9, 12…) sp, dc3tog between 2 dc3tog, 3 dc in each sp to corner, (3 dc, ch 3, 3 dc) in corner ch 3 sp, repeat from * to last corner, 2 dc in last corner ch 3 sp. Join to sdc.
Repeat these six rounds — 4, 5, 6, 7, 2, 3 — until your work is the size you desire. End on Round 4 or 7.
Border
The border can be worked in one or several colors, I’ve given instructions to change colors on each round.
Border Round 1: Join with a sc on the second st from any corner, *ch 3, sk 2, sc in next st. Repeat from * around, working [ch 3, sc, ch 2, sc] in each corner ch 2 sps. Join with sl st to first st of round. Fasten off. Adjust your skips so that they are symmetrical on the corners and verify that you have the same number of ch 3 sps on each side of the work.
Border Round 2: Join with sc in any ch 3 sp, *ch 3, sc in next sp. Repeat from * around, working [ch 3, sc, ch 2, sc] in corner ch 2 sps. Join with sl st to first st of round. Fasten off.
Repeat Border Round 2 one or more times, adjusting your skips so that you finish with a multiple of 3 ch 3 sps on each side of your work.
Border Round 3: Join with sc on sp next to corner sp, *7 dc in next sp, sc in next sp, ch 3, sc in next sp. Repeat from * to corner, [ch 3, sc, ch 2, sc] in corner sp, ch 3, sc in next sp, repeat from * around. Join with sc in first ch 3 sp. Fasten off.
Border Round 4: Join with sc in any ch 3 sp, *working across 7 dcs, (bpdc, ch 1) 6x, bpdc, sc in ch 3 sp. Repeat from * to corner, 3 dc in corner ch 2 sp, sc in next ch 3 sp. Repeat from * around. Join with sl st to first sc.
Fasten off. Weave in all ends.
An international community of yarnful makers and friends.
- New pattern pre-releases
- Exclusive patterns never released to the public
- Have access to Betty’s ad-free .pdf library of patterns (3-4 patterns/month)
- Access to Betty’s Design Workshop
- Uplevel your knitting and crochet skills
- Enjoy regular crochet alongs, knit alongs, and classes
- Make like-minded friendships during our weekly social and educational events
- Bonus content every month
Items created with this pattern may be used for commercial sale with credit to Betty McKnit in your listing. Mass production is not permitted.
Beth McKee Elliott, also known as Betty McKnit, is a crochet and knitting designer, instructor, community leader, and Master Somatic Movement Therapist and Educator. Her signature style, 6-Day Crochet, is showcased in the viral crochet patterns the 6-Day Kid Blanket and 6-Day Star Blanket.
Beth/Betty is passionate about designing quick, adaptable, go-to crochet and knitting projects, and is committed to being accessible to assist crafters in bringing their dream projects to life.
She specializes in Somatic Crochet and Knitting, a mindfulness practice that combines crochet/knitting with body awareness techniques to prevent injury and promote well-being and creativity in crafting.
This pattern is the intellectual property of Beth McKee Elliott aka Betty McKnit®. This pattern, The 6-Day Kid Blanket, 6-Day Crochet™, 6-Day Star Blanket™, and all derivative works are protected by copyright. Publishing translations, corrections, variations, or tutorials of this pattern, online or elsewhere without written permission from the owner is a violation of copyright.
Crochet Pattern
Granny Blanket
6-Day Crochet
Betty McKnit
Crochet for Beginners
DIY Blanket
Yarn Crafts
Crochet Tips
©Beth McKee Elliott/Betty McKnit®
www.bettymcknit.com