
The 6-Day Baby Boy Blanket
The 6-Day Baby Boy Blanket uses Nurturing Fibres Eco Cotton in traditional little boy blues with grey and brown accents. It is striped in the the original “Vivid Chevron” pattern, and includes a special simple two-row border.
Finished Size: 30″ by 41”
Skill Level: Intermediate
Materials: 1500m/1641yards of light double-knit weight yarn divided as follows
Color A – Dark Blue (Baltic) 250m/274yards
Color B – Light Grey (Anvil) 250m/274yards
Color C – Light Blue (Watershed) 375m/410yards
Color D – Brown (Pecan) 250m/274yards
Color E – Medium Blue (Denim) 375m/410yards
The blanket shown is made with Nurturing Fibres Eco Cotton. Purchase a kit with for all the Nurturing Fibres yarn you will need at Good Loops Yarns
You will need the following to make this blanket as shown:
2 Baltic, 2 Anvil, 3 Watershed, 2 Pecan, 3 Denim
… or substitute your favorite DK weight yarn in similar shades.
Hook: 4 mm (4.5 for foundation chain if you tend to chain tightly).
Abbreviations:
ch: chain
dc: double crochet
dc3tog: (NOT TO BE CONFUSED WITH dec dc3tog).
In this pattern, dc3tog is worked into one stitch – not over three stitches
[yarn over, pull up a loop, pull through two loops] 3 times. Yarn over, and pull through all 4 loops on the hook. (Be sure to pull up a loop in the same stitch every time.) dc3tog complete.
hdc: half double crochet
rep: repeat
sc: single crochet
sk: skip
sp(s): space(s)
Begin the pattern
With Color A – Dark Blue (Baltic), ch 139
Row 1: (RS) 1 sc into 2nd ch from hook, 1 sc into each ch to end.
Turn
When working the last stitch of each row from row 2 onward, insert the hook into the row below from back to front, instead of from front to back.
 Row 2: ch 3, sk first 3 sc (the sc on the end of the row, the one below your turning chain counts as 1)
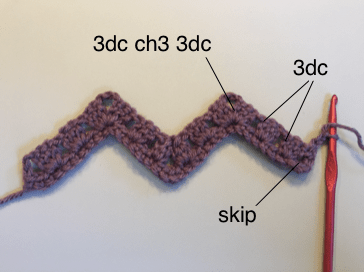
[3dc in next sc, sk next 2 sc] twice, [3 dc, ch 3, 3 dc] into next sc
*sk next 2 sc, 3dc into next sc, sk next 2 sc, dc3tog
sk next 4 sc, dc3tog, sk next 2 sc, 3 dc in next sc, sk next 2 sc
[ 3 dc, ch3, 3 dc] into next sc; rep from * to last 9 sc
sk next 2 sc [3 dc into next sc, sk next 2 sc] twice, 1 dc into last sc.
Turn
Row 3: ch 3, sk sp between turning ch and next 3-dc group, 3 dc into each of next 2 sp
[3dc, ch3, 3dc] into next ch-3 sp
*3 dc into next sp, dc3tog into next sp
sk next sp, dc3tog into next sp, 3 dc into next sp, [3dc, ch3, 3dc] into next ch- 3 sp
rep from * to last 3 sps, 3 dc into each of next 2 sps
1 dc into sp between last 3 dc group and turning ch.
Turn
Row 4: ch 1, sc into first dc of the row (the one right below your turning chain)
sk next dc, 1 sc into each of next 8 dc
*3 sc into next ch 3 sp, 1 sc into each of next 14 sts
repeat from * to last ch-3 sp, 3 sc into last ch-3 sp
1 sc into each of next 8 dc, sk next dc, 1 sc into 3rd st of ch 3.
Turn
Change to Color B – Light Grey (Anvil)
When changing colors, pull the new color through the last two loops of the last stitch of the previous color. Break the yarn for the old color.
Row 5: Ch 3, sk first 2 sc of the row below (the sc your turning chain is coming out of counts as the first one). 1 dc into each of next 8 sc
*3 dc into next sc (you should be working these into the center stitch of the 3 sc. If not, you may have skipped incorrectly in the beginning of the row.) 1 dc into each of next 7 sc
sk next 2 sc, 1 dc into each of next 7 sc
rep from * to last 11 sc, 3 dc into next sc, 1 dc into each of next 8 sc
sk next 2 sc, 1 dc into the turning chain from the row below.
Turn
 Row 6: Ch 3, sk first 2 dc in the row below (the dc below your turning chain counts as 1)
1 dc into each of next 8 dc
*3 dc into next dc (you should be working into center stitch of 3 dc)
1 dc into each of next 7 dc, sk next 2 dc, 1 dc into each of next 7 dc
rep from * to last 10 dc
3 dc into next dc, 1 dc into each of next 8 dc, sk last dc, 1 dc into 3rd st of ch 3, turn.
Change to Color C – Light Blue (Watershed)
Row 7: Ch 1, sc into first dc (the same one the turning chain is coming out of), sk 1 dc
1 sc into each dc along row to last dc
sk last dc, 1 sc into 3rd ch of ch 3, turn.
Repeat rows 2-7 11 times (for a total of 12 repeats), continuing to change colors before each row 5 and 7 and continuing the sequence of colors in the order given, ending with Color D – Brown (Pecan). (Stay with Color C for rows 7 – 4, change Color D before row 5, change to Color E before row 7, then start over with Color A, changing before rows 5 and 7 to the next color in the sequence).
Change to Color E – Medium Blue (Denim) and Repeat rows 2-4 one time more time.
You should go through the sequence of 5 colors 5 times, and have a total of 25 stripes/color sections.
Border Round 1
When working sc into the sides of the blanket, use the turning chains and the dc stitches as foundation chains, working under 2 threads of each stitch and leaving one thread below. This creates a beautiful even edge to the work.
Join Color C – Light Blue (Watershed) in any sc along left side of blanket. Work 1 sc into the side of each sc, approximately 3 sc into the side of each dc, and approximately 3 sc into each set of turning ch sts on the side edge.
Work 3 sc in corner. Rotate 1/4 turn, working along the bottom of the starting chain, *16 sc, 3 sc in next st (should be approximately the top of the point) repeat from * to corner, 3 sc in corner.
Rotate 1/4 and work right hand side of blanket as the left hand side, working 3 sc in the corner.
Rotate 1/4, work across top of blanket 10 sc, 3sc in next st (top of point) *16 sc, 3 sc in next repeat from * to last point, 3 sc in last point, 10 sc to end. 3 sc in corner.
Continue left side of blanket as before, join with sl st to the first sc of the round. Fasten off.
Border Round 2:
Join Color E – Medium Blue (Denim) into any sc on left side
Work 1 hdc in each sc around, working 3 hdc in each corner and in the center sc of each point. Sk 2 hdc at the bottom of each “valley” on the top and bottom of the blanket. Join with sl st to first hdc.
Border Round 3:
Join Color C – Light Blue (Watershed) and work as round 2.
Weave in all ends.
For questions about this pattern, feel free to email me at [email protected]
Join us in the 6-Day Kid Blanket Facebook Group
Video tutorials available on Betty’s YouTube Channel.
This pattern is the intellectual property of Betty McKnit/Beth Elliott, and it is protected by copyright. Publishing corrections, translations, written or video tutorials, or variations of this pattern, online or elsewhere, without written permission from the owner is a violation of copyright.
The stitch pattern is “Vivid Chevrons” #110 from 200 Ripple Stitch Patterns by Jan Eaton.
Reprinted with permission from Quarto Publishing.
Thank you to Marianne Killackey for testing this pattern and for this border edge.
Thank you to other pattern testers Serah Freeman Carrier and Angela Brown.
Join us in the 6-Day Kid Blanket Group on Facebook for help, camaraderie, and showing off your blankets!
Support Betty on Patreon! Patrons receive behind-the-scenes content, access to ad-free .pdf’s of Betty’s pattern library, new pattern pre-releases, community zoom calls, private coaching with Betty and more! Sign up on Patreon, and make a pledge to join the fun!
This site contains affiliate links.