6-Day Tranquil Trails Scarf
Tranquil Trails Scarf
A 6-Day Crochet™ Pattern by Betty McKnit
Introduction
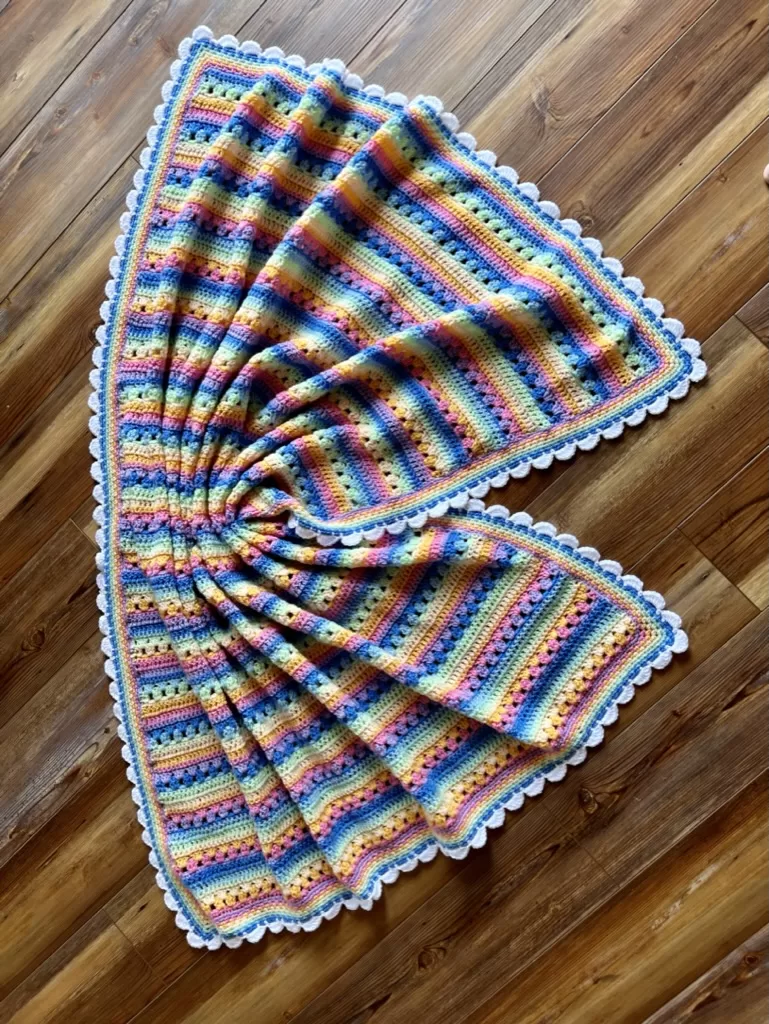
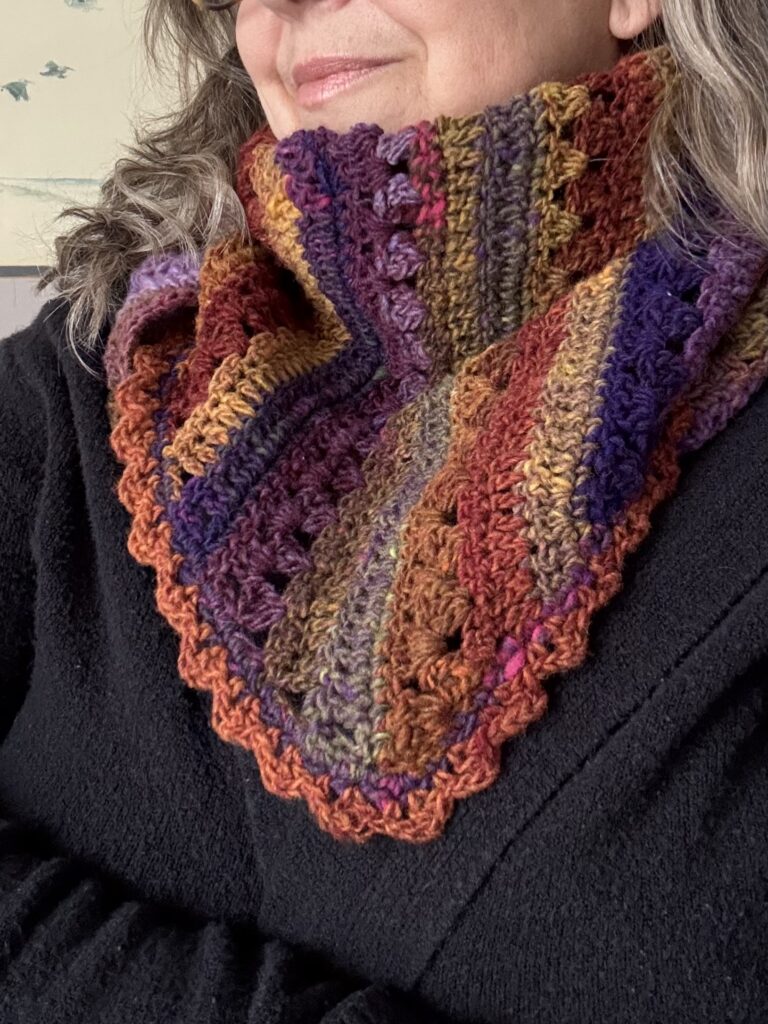
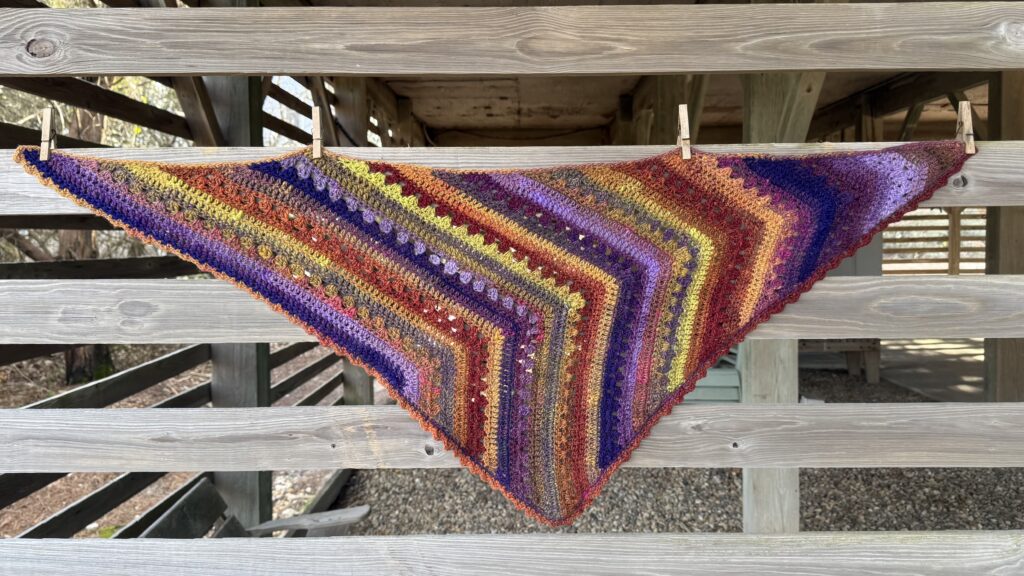
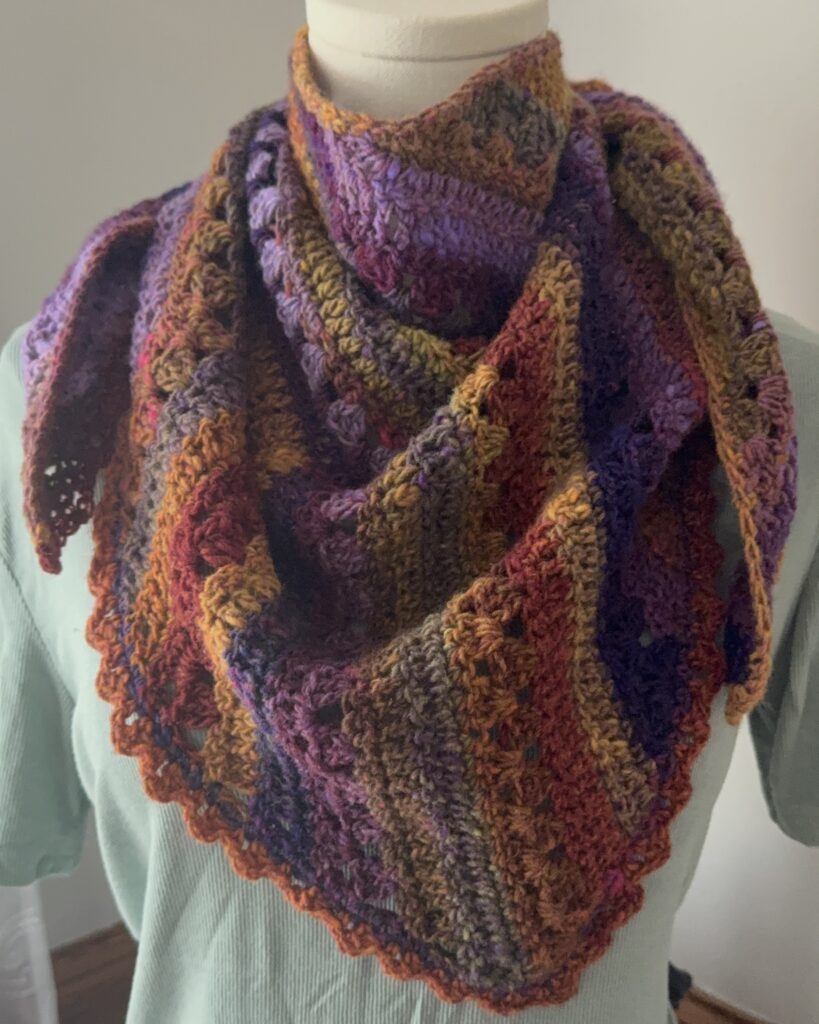
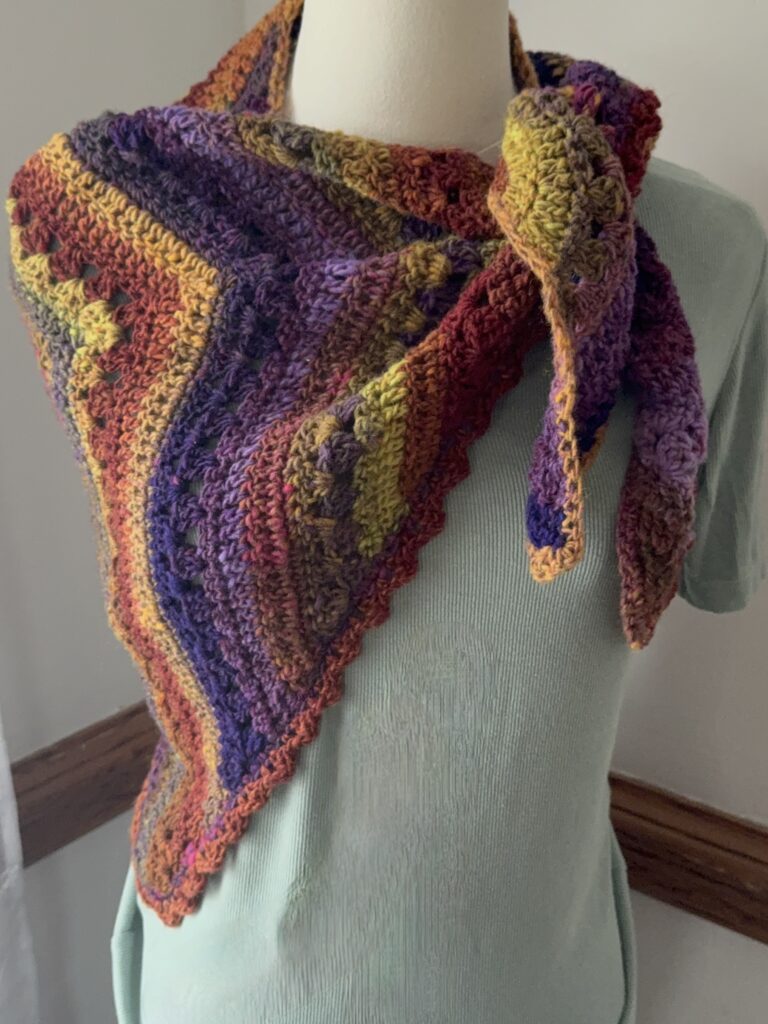
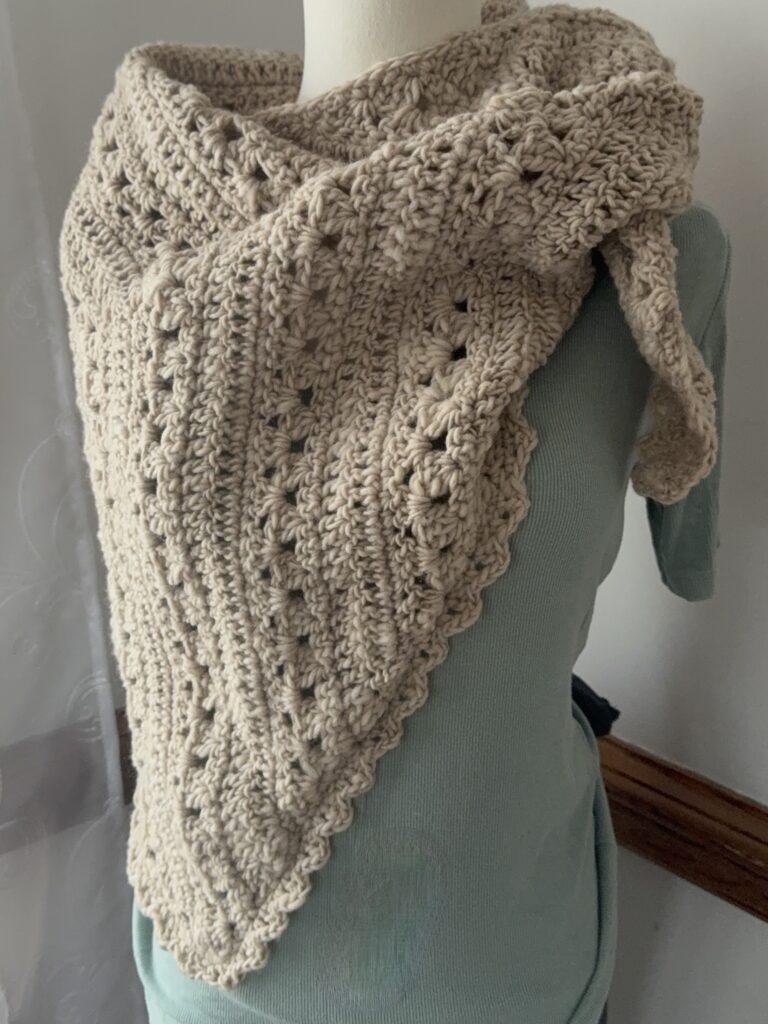
Welcome to Tranquil Trails, a delightful triangular crochet scarf in the 6-Day Crochet™ style. With its playful and unique construction, this scarf is perfect for creating a chic bandana that’s both stylish and practical. The slightly asymmetrical kite-like shape features a distinctive chevron down the center, making it a fun and engaging project to crochet.
This scarf is the ideal accessory to showcase the stunning colors and textures of Noro yarn. Its clever design, combined with the lovely stitches and characteristic center chevron, highlights the beauty of Noro’s fibers. Designed specifically for one ball of Noro Saiun, this project uses approximately 500 yards of light worsted weight yarn.
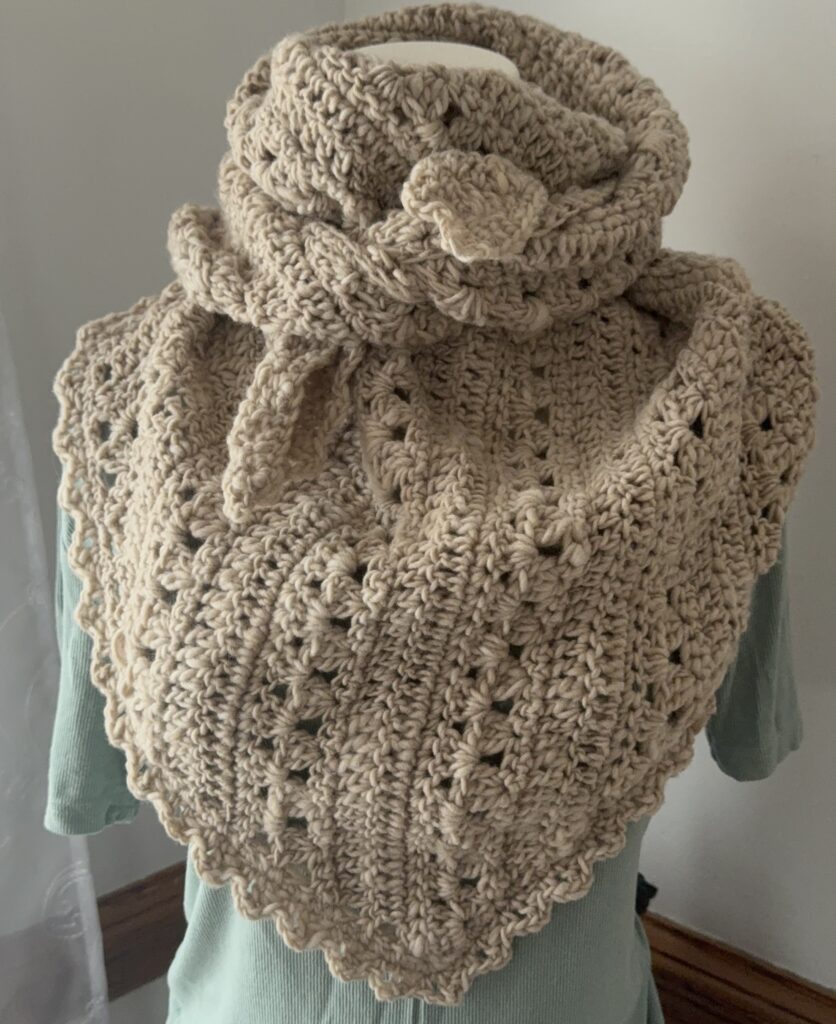
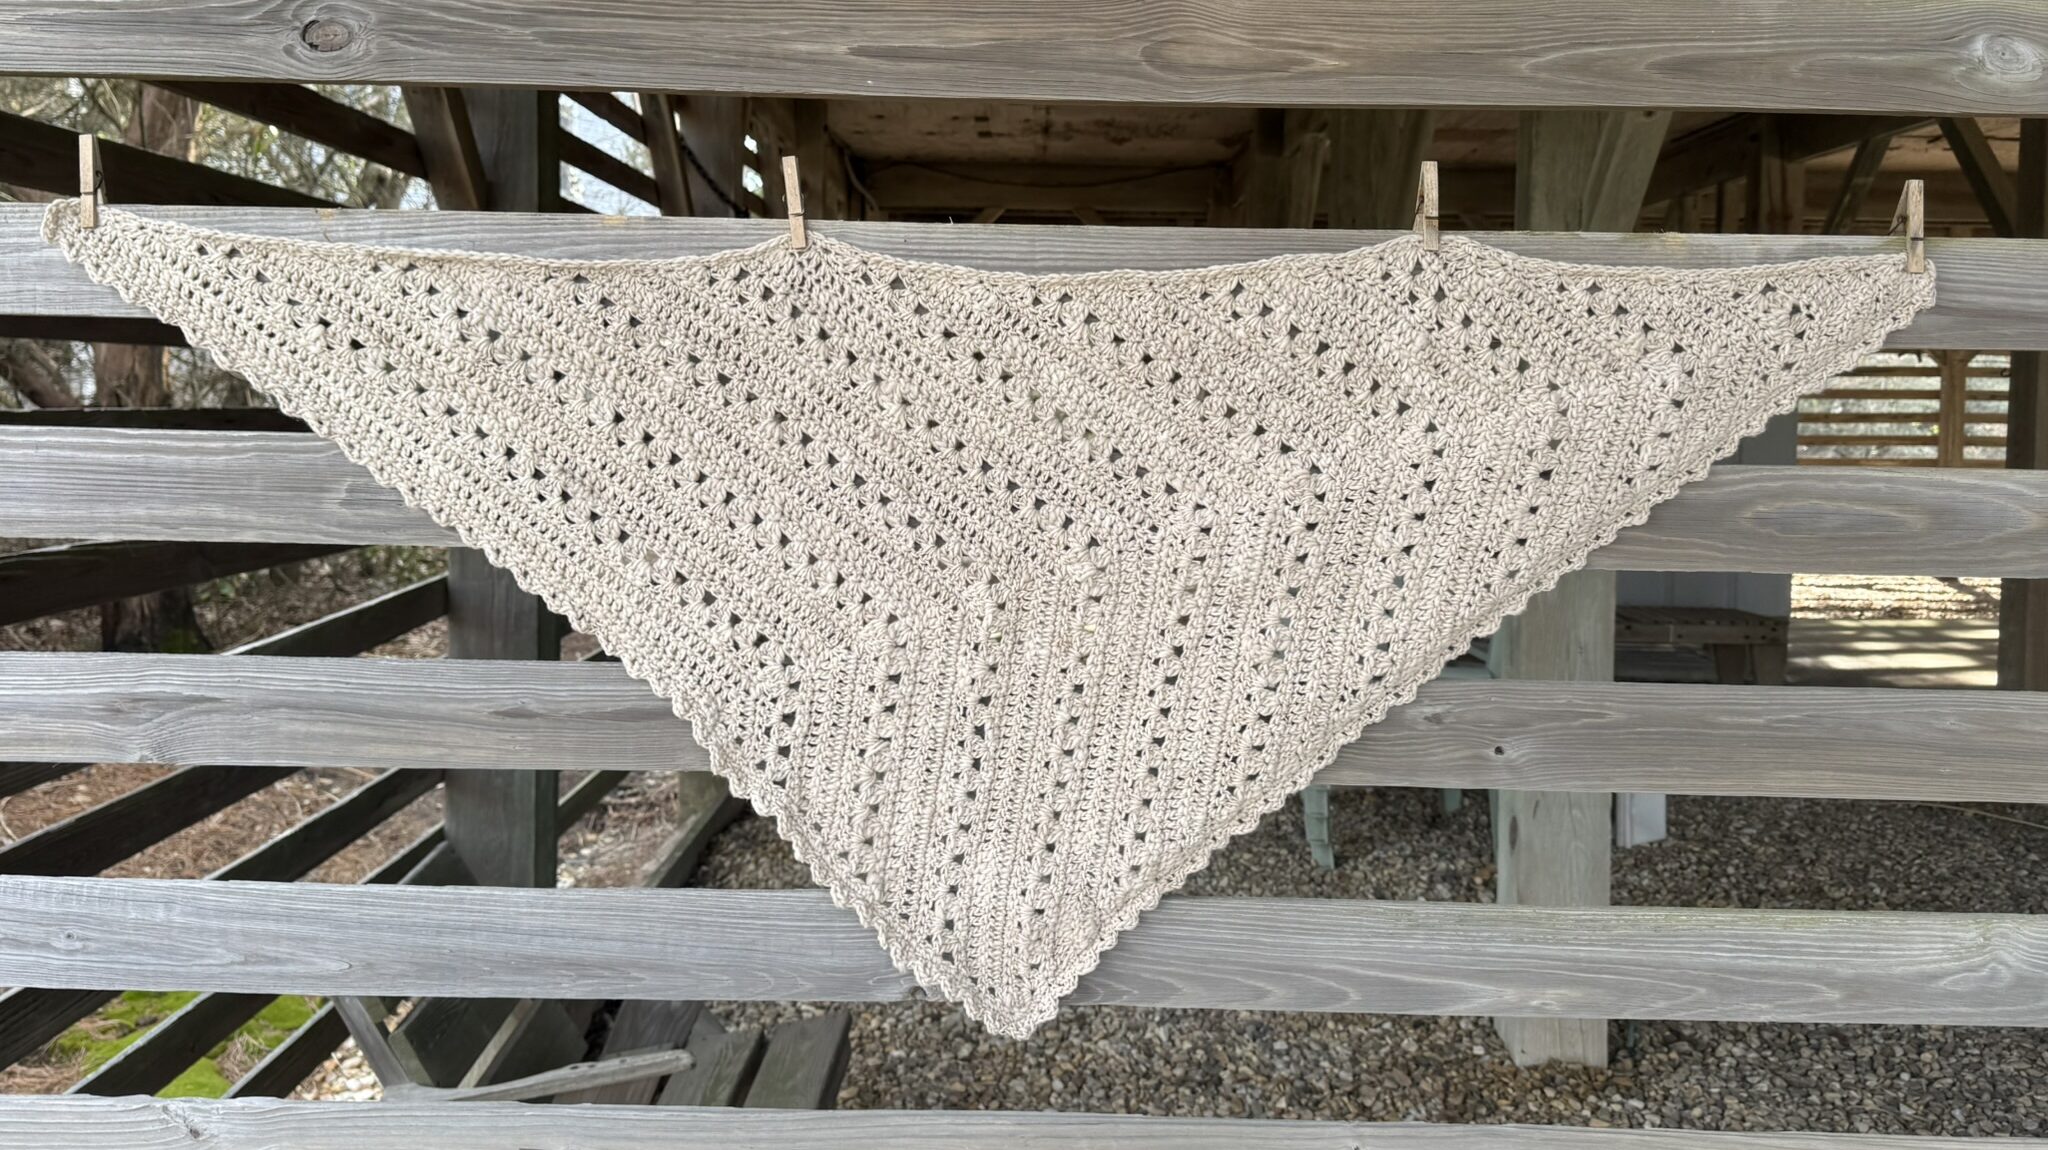
If you prefer to use a different yarn, the Halfway Home on Tranquil Trails pattern is an adaptable version of this project.
This page contains affiliate links. If you click these links and buy something on the page they take you to, I may, at no additional cost to you, earn a commission. I only affiliate with products and companies I feel good about. Thank you for your support!
This pattern is provided free with advertisements on this page. If you would like an ad-free .pdf, you can purchase one at the bottom of the page. The .pdf is the same as this pattern, with the exception of the ads.
Details
US Terminology with UK Conversions
Skill Level: Intermediate
This project contains simple stitches, but the shaping concepts may be confusing for beginners.
Finished Size: 56” w, 21” l
Gauge: 16 sts and 11 rows over 4” in pattern
Materials
500 yards US 4 Worsted weight
Shown in Noro Saiun
One 150g/ 450m/492 yard ball
US 4 Worsted weight 70% wool 30% polyamide
Hook: 5.5 mm
Also shown in Noro Haunui
100% Wool US 4/5 Medium/Bulky
Two 200g/476y balls
Hook: 6 mm
Scissors
Yarn needle
Stitch marker
Abbreviations
- bet: between
- ch: chain
- dc: double crochet
- dec dc2tog: decrease double crochet two together
- dc2tog over 2: decrease double crochet two together over two stitches
- dc2tog over 3: decrease double crochet two together over three stitches
- dc3tog: double crochet three together cluster
- edc: extended double crochet
- rep: repeat
- sc: single crochet
- sl st: slip stitch
- sk: skip
- sp(s): space(s)
- st(s): stitch or stitches
- st3sc: stacked single crochet x 3
- st3sc: 3 stacked single crochet
- sc2tog: decrease single crochet two together
- sc2tog over 3: decrease single crochet two together over three stitches
- x: times
- sp(s): space(es)
- yo: yarn over
| US terms abbreviation | UK terms abbreviation |
| single crochet sc | double crochet dc |
| half double crochet hdc | half treble crochet htr |
| double crochet dc | treble crochet tr |
Special Stitches
dec dc2tog: [yo, pull up a loop in the next st/sp, yo, pull through two loops] twice. yo and pull through all loops on the hook.
dc2tog over 2: yo, pull up a loop in the next stitch, yo and pull through two loops leaving the rest of the stitch unworked, yo, pull up a loop in the next stitch, yo and pull through two loops, yo and pull through all remaining loops.
dc2tog over 3: yo, pull up a loop in the next stitch, yo and pull through two loops leaving the rest of the stitch unworked, sk the next st, yo, pull up a loop in the next stitch, yo and pull through two loops, yo and pull through all remaining loops.
dc3tog: (cluster): yo, insert hook in next st/sp, yo, pull up a loop, yo, pull through 2 loops, [yo, insert hook into same st/sp, yo, pull up a loop, yo, pull through two loops] 2 times. yo and pull through 4 loops.
edc: yo, pull up a loop in the next st, yo and pull through one loop on the hook, [yarn over and pull through two loops on the hook] twice.
sc2tog: pull up a loop in each of the next 2 sts, yo and pull through both loops on the hook.
sc2tog over 3: pull up a loop in next sts, sk next st, pull up a loop in the next st, yo and pull
through both loops on the hook.
st3sc: stacked single crochet x 3 (counts as 1 st): work sc into stitch or space indicated, work sc into left side loop of sc just made. Work a third sc into side of second sc for 3 stsc.
Construction
Worked back and forth (turn after each row) starting from one corner and increasing on both sides.
Work the Setup Rows one time and proceed to Increase Rows. Do not repeat Setup Rows.
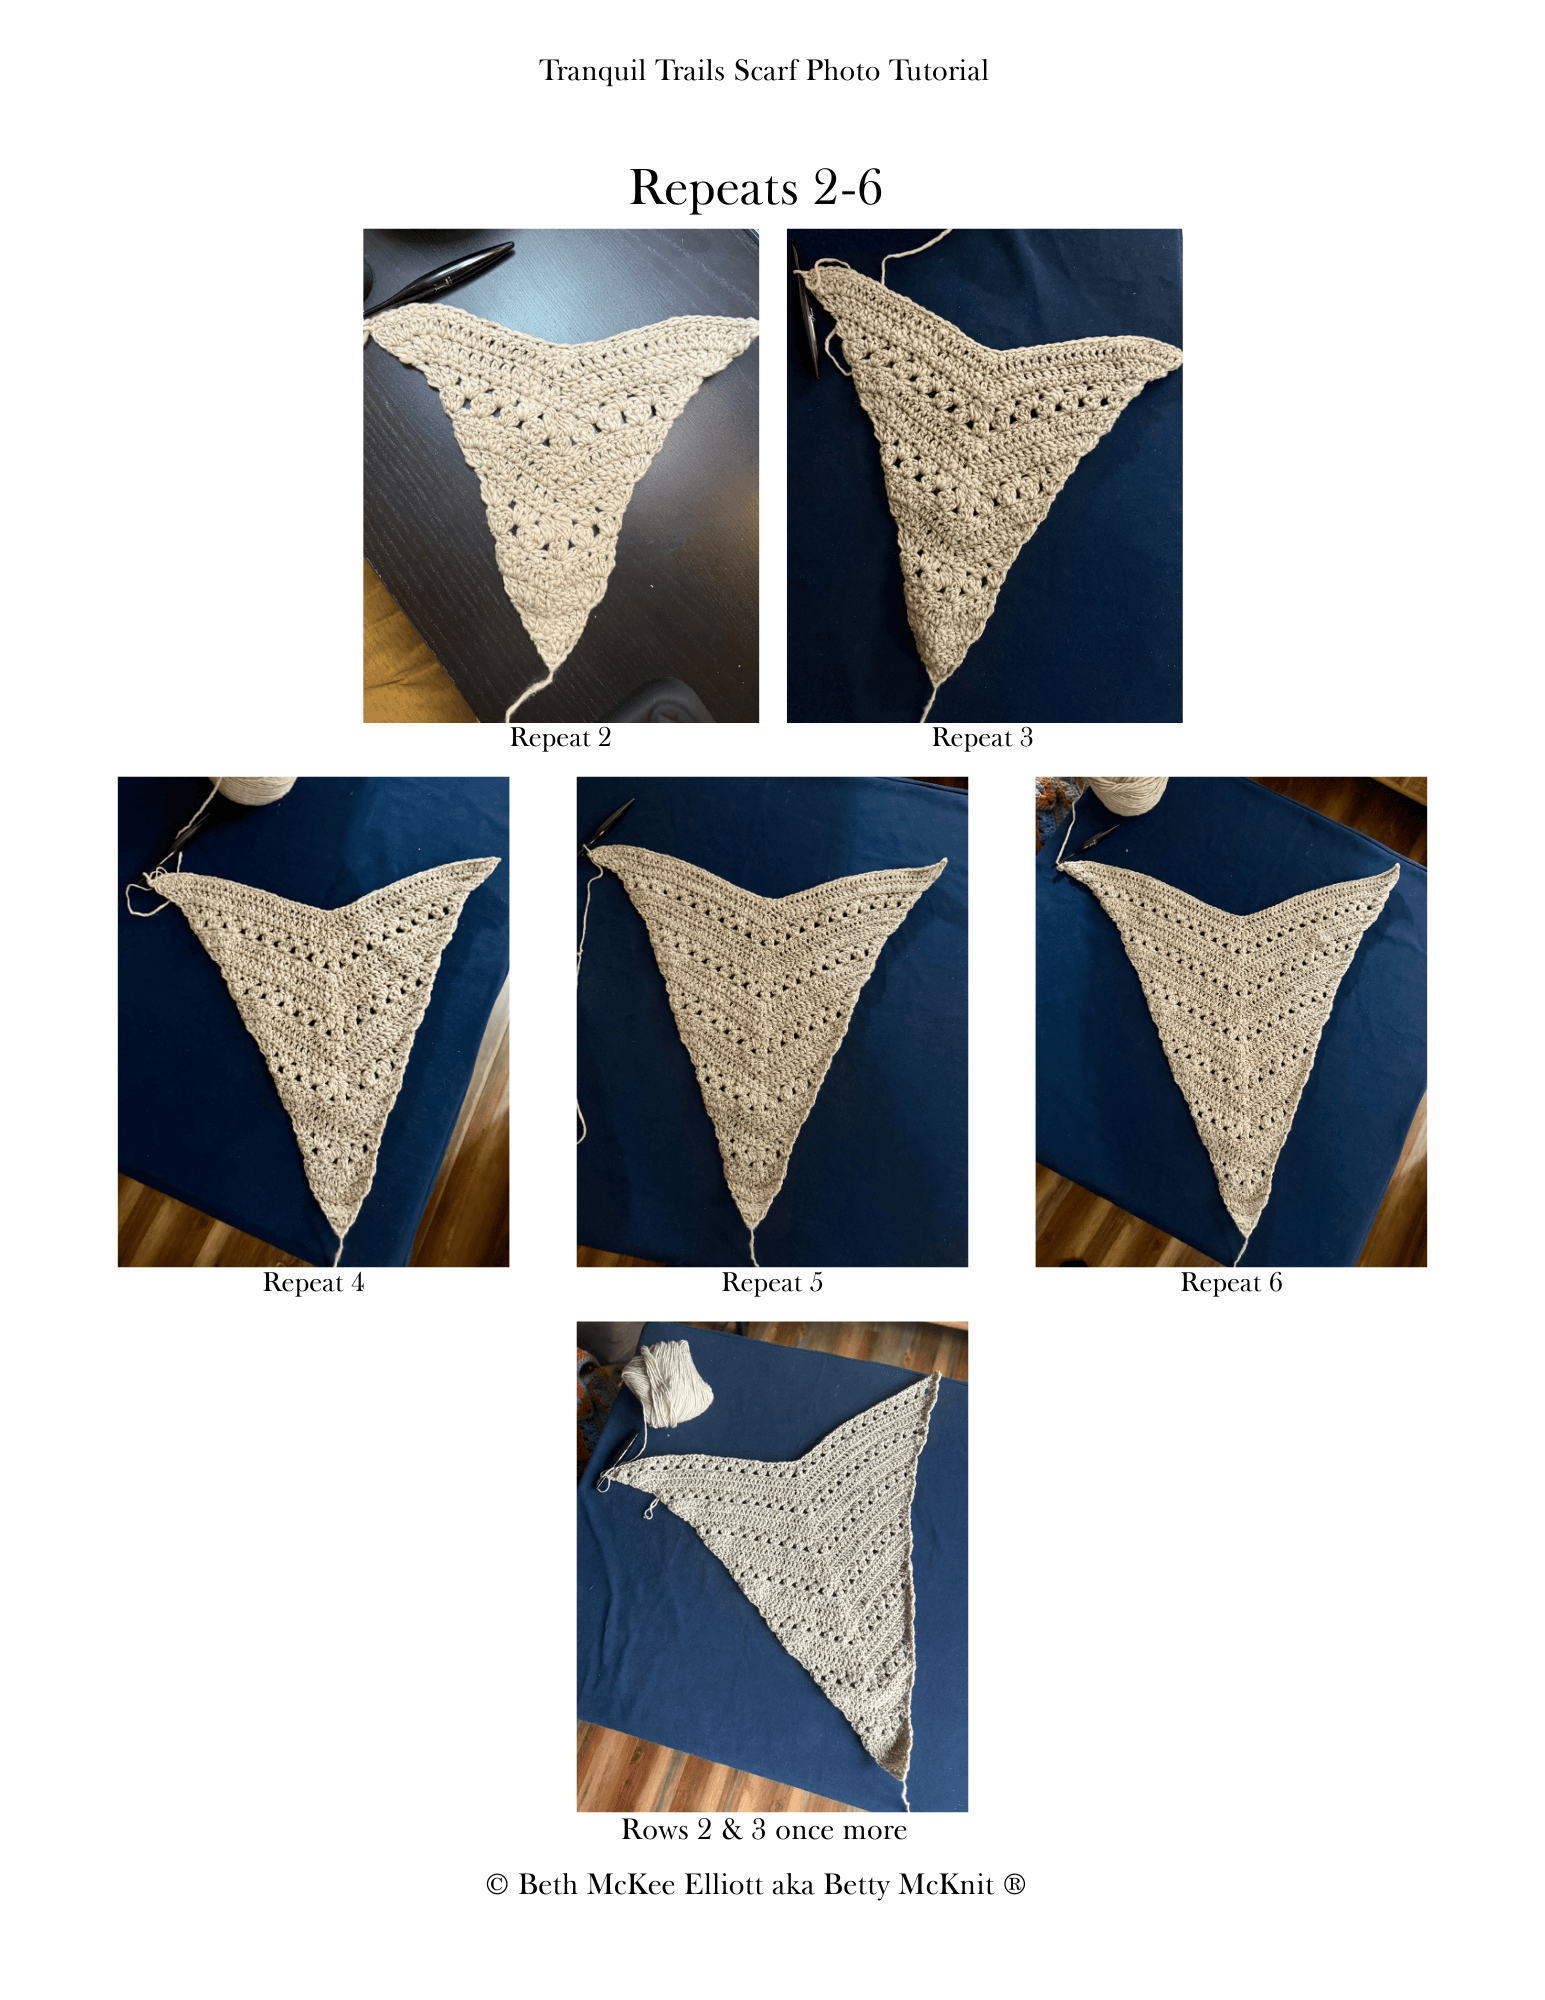
Repeat Increase Rows 2-7 until you have used ½ of your yarn. Proceed to Decrease Rows.
The work will now decrease on one side, and continue to increase along the other until the decreases meet the chevron point in the center of the scarf.
Work a round of single crochet around the entire scarf and a border along two or three sides as desired.
Repeats
( ) Work in the same st or sp.
[ ] Repeat everything within the brackets the indicated number of times.
Stitch Counts
- Row stitch counts between < >
- Stitch counts in decrease section given as +/- number of stitches from previous row
- Counts for subsequent rounds are given in parentheses like so: first repeat (second repeat, third repeat) etc.
- I’ve provided stitch counts for eleven repeats of the increase rows. You can do more or less as desired.
- st3sc/stdc counts as dc
- First stitch of the row, stitch below the chain, counts as first stitch unless otherwise indicated
Notes
- Unless otherwise indicated, do not ch 1 before st3sc
- st3sc counts as 1 st
- st3sc can be replaced with ch 3, or stsc
Does it Really Take 6 Days?
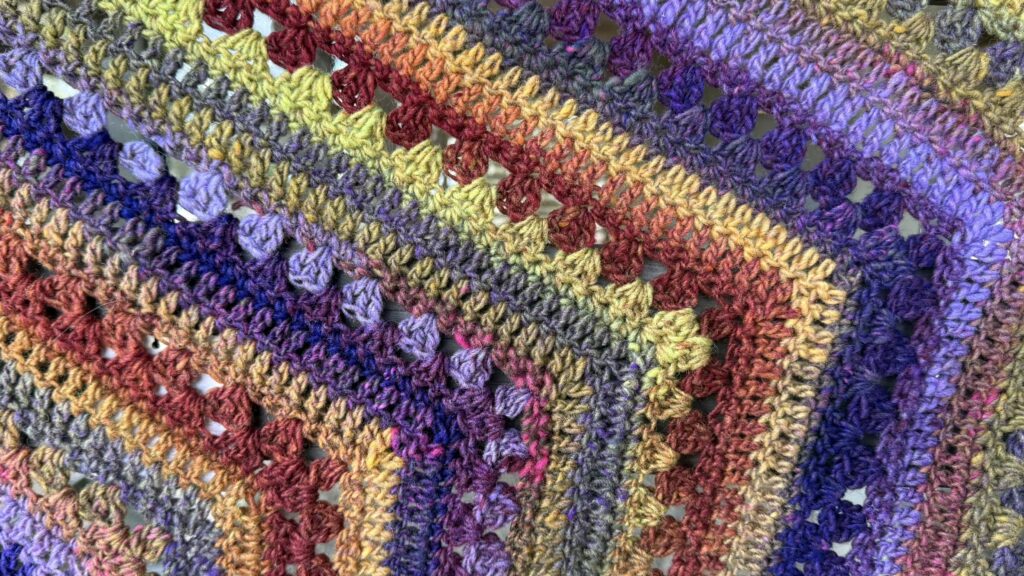
6-Day Crochet refers to alternating rows or rounds of sc, dc, and clusters, sometimes with and sometimes without chevrons. The name of the pattern came from the original 6-Day Kid Blanket, which was toddler sized and made with chunky yarn, and just happened to take me an easy six days to make.
For more information please see my article, Why is it Called the 6-Day Kid Blanket?
This pattern as written can easily be completed in six days, but there is no challenge or rush. Enjoy the process.
Row Numbering
All 6-Day Crochet patterns have a consistent numbering for the characteristic six rows of the signature stitch. Rows 2 and 3 are always cluster rows, Rows 5 and 6 are always dc rows, and rows 4 and 7 are always sc rows. Row numbering in the pattern may not always be consecutive and you’ll be directed where to go next.
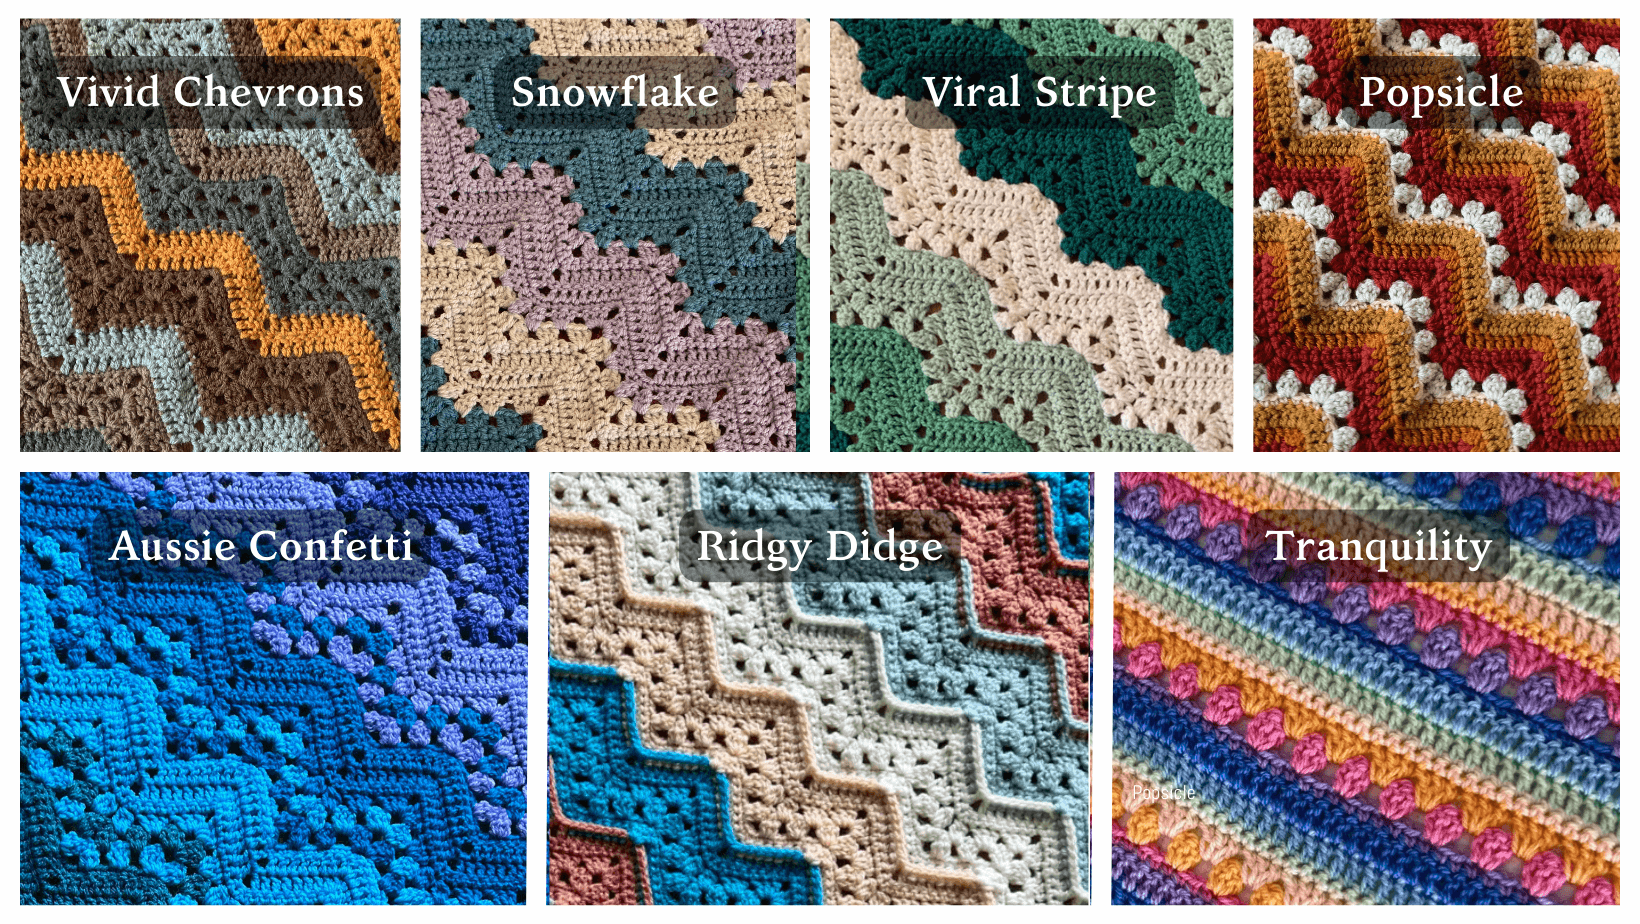
Stripe
There are many ways to adapt the 6-Day Crochet stitch sequence by changing colors on different rows or adding texture to create a completely different look with the same stitches. Some of the different stripes are referred to as Vivid Chevrons (the original), The Snowflake Effect, Viral Stripe, Sweetheart Stripe, Popsicle Effect, and Ridgy Didge. This chevron-less version of the 6-Day Crochet stitch is referred to as the Tranquility Stripe.
No specific color changes are given in this version. For more information about different ways to stripe your 6-Day Crochet projects, please see my article No Two 6-Day Kid Blankets Are Alike.
Community Support
The best way to get support if you have questions about this pattern is through my Facebook community dedicated to helping crocheters with the 6-Day Crochet Projects. It’s loaded with free resources and people to answer your questions, cheer you on, and appreciate your finished projects.
Join my membership community The Betty McKnitiverse and ask questions directly during one of my many community zoom calls.
Begin Pattern
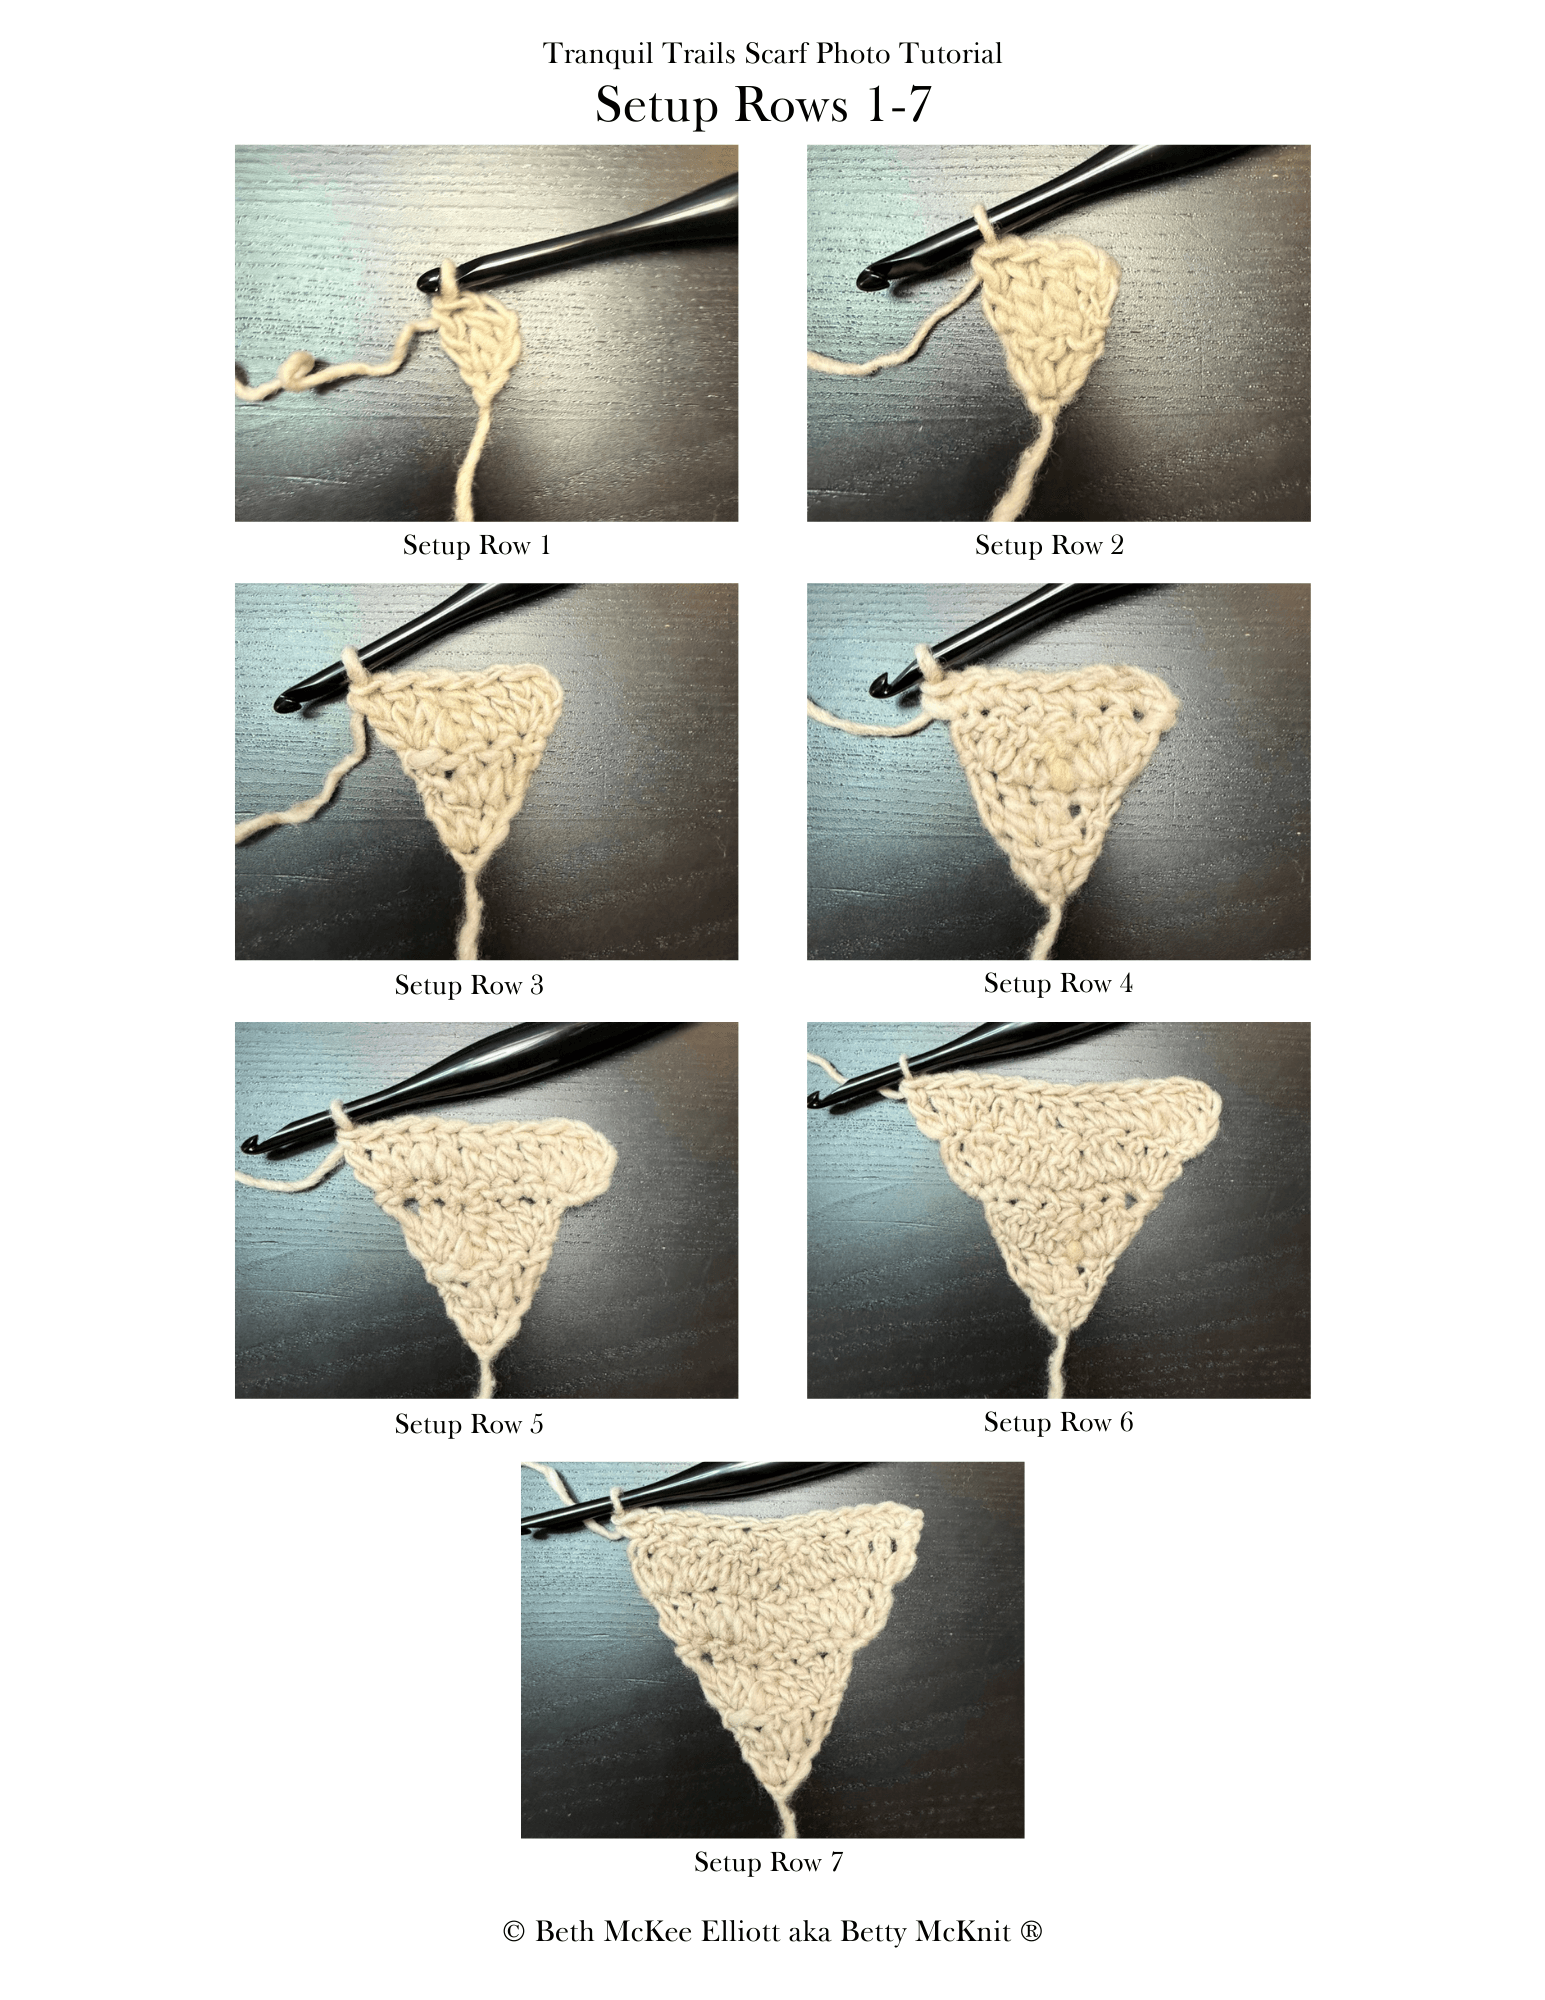
Setup Rows
Setup Row 1: ch 3 (counts as 1 st), 2 dc in first ch. Turn.
<3>
Setup Row 2: stsc, 2 dc in next st.dc in top of ch 3. Turn.
<4>
Setup Row 3: stsc, 2 dc in same st, dc2tog over next 2 sts, 3 dc in last st. Turn.
<7>
Setup Row 4: ch 1, 2 sc in same st, sc in next 2 sts, sk 1, sc in next 2 sts, 2 sc in last st. Turn.
<8>
Setup Row 5: st3sc, edc in same st, 2 dc in next st, dc in next st, dc2tog over 2, dc in next st, 2, dc in next st, (dc edc) in last st. Turn.
<11>
Setup Row 6: st3sc, edc in same st, 2 dc in next st, dc in next 2 sts, dc2tog over 3, dc in next 2 sts, 2 dc in next st, 2 edc in last st. Turn.
<13>
Setup Row 7: ch 1, 2 sc in same st, sc in next 4 sts, sc2tog over 3, sc in next 4 sts, 2 sc in last st. Turn.
<13>
Setup Rows Complete. Proceed to Increase Rows 2-7. Do not repeat the Setup Rows.
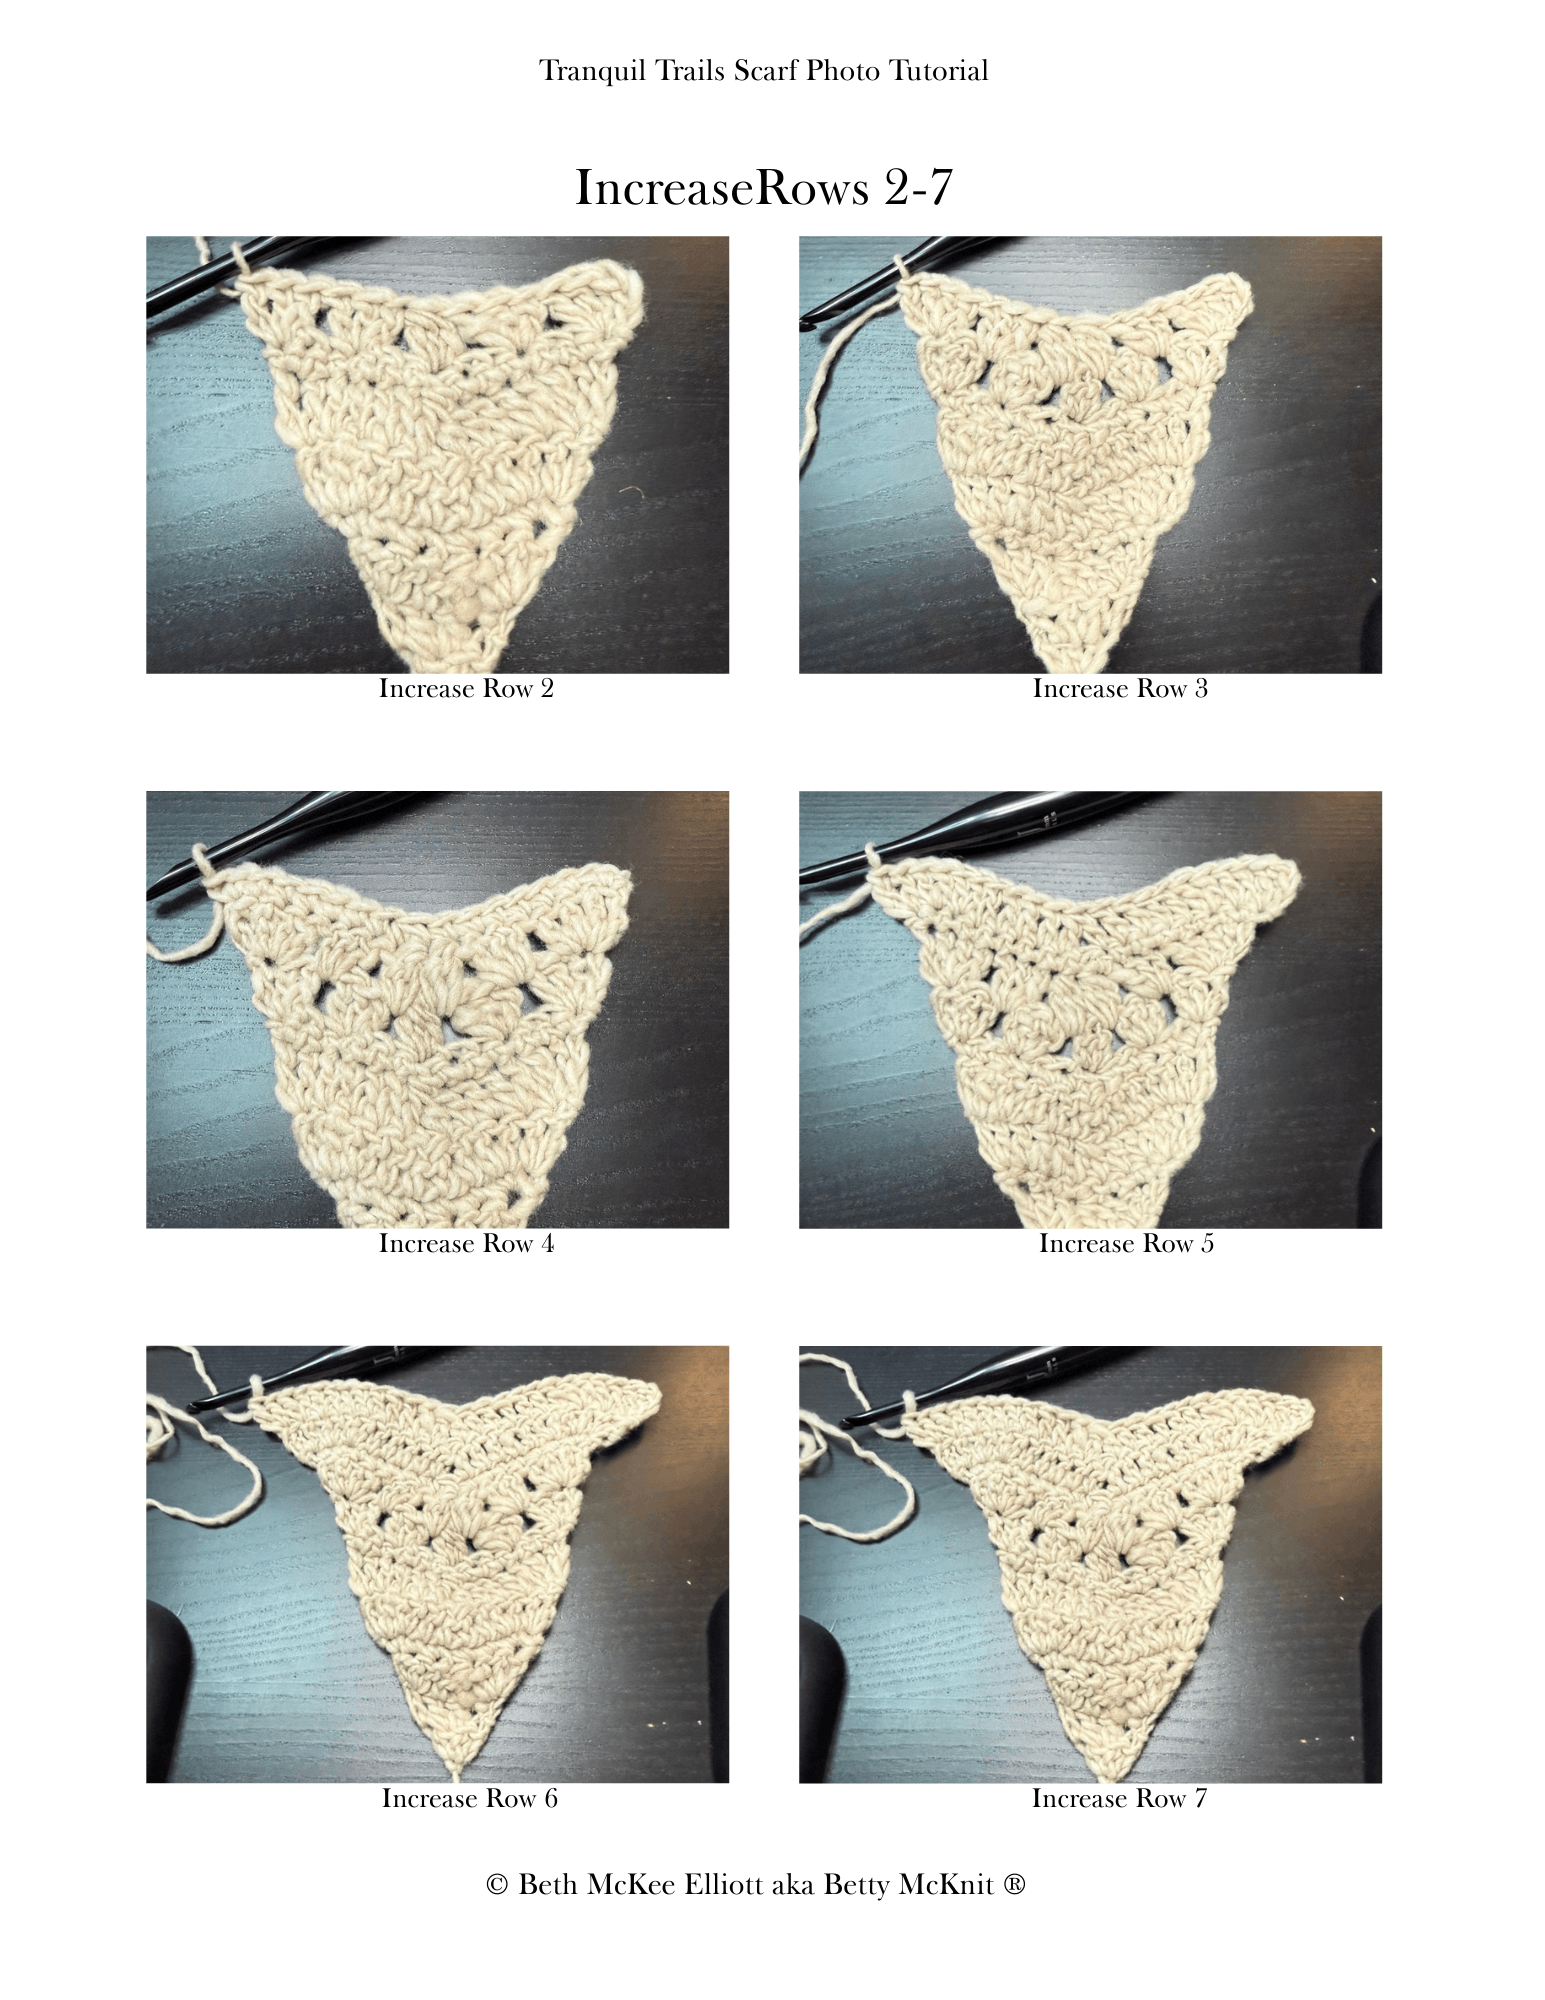
Increase Rows
Increase Row 2: (st3sc, edc, dc) in same st, [sk 2, 3 dc in next st] 1 (3, 5, 7, 9, 11, 13) x, sk 2, dc3tog, [sk 2, 3 dc in next] 1 (3, 5, 7, 9, 11, 13) x to last 3 sts, sk 2, (2 dc, edc) in last st. Turn.
<13, 25, 37, 49, 61, 73, 85>
Increase Row 3: (st3sc, edc, 2 dc) in same st, 3 dc in next 1 (3, 5, 7, 9, 11, 13) sp(s), dc3tog in next 2 sps, 3 dc in next 1 (3, 5, 7, 9, 11, 13) sp(s), (2 dc, 2 edc) in last st. Turn.
<16, 28, 40, 52, 64, 76, 88>
Increase Row 4: ch 1, 2 sc in same st, sc in next 6 (12, 18, 24, 30, 36, 42) sts, sc2tog, sc in each st to last st, 2 sc in last st. Turn.
<17, 29, 41, 53, 65, 77, 89>
Increase Row 5: (st3sc, edc in same st), 2 dc in each of next 2 sts, dc in next 4 (10, 16, 22, 28, 34) sts, dc2tog over 3, dc in each st to last 3 sts, 2 dc in each of next 2 sts, (dc, edc) in last st. Turn.
<21, 33, 45, 57, 69, 81>
Increase Row 6: (st3sc, edc in same st), 2 dc in next 2 sts, dc in next 6 (12, 18, 24, 30, 36) sts, dc2tog over 3, dc in each st to last 3 sts, 2 dc in each of next 2 sts, (dc, edc) in last st. Turn.
<25, 37, 49, 61, 73, 85>
Increase Row 7: ch 1, 2 sc in same st, sc in next 10, (16, 22, 28, 34, 40) sts, sc2tog over 3, sc in each st to last st, 2 sc in last st. Turn.
<25, 37, 49, 61, 73, 85>
Repeat Increase rows 2-7 5x times for a total of 6 repeats. Repeat Increase Rows 2 and 3 once more. Proceed to Decrease Rows.
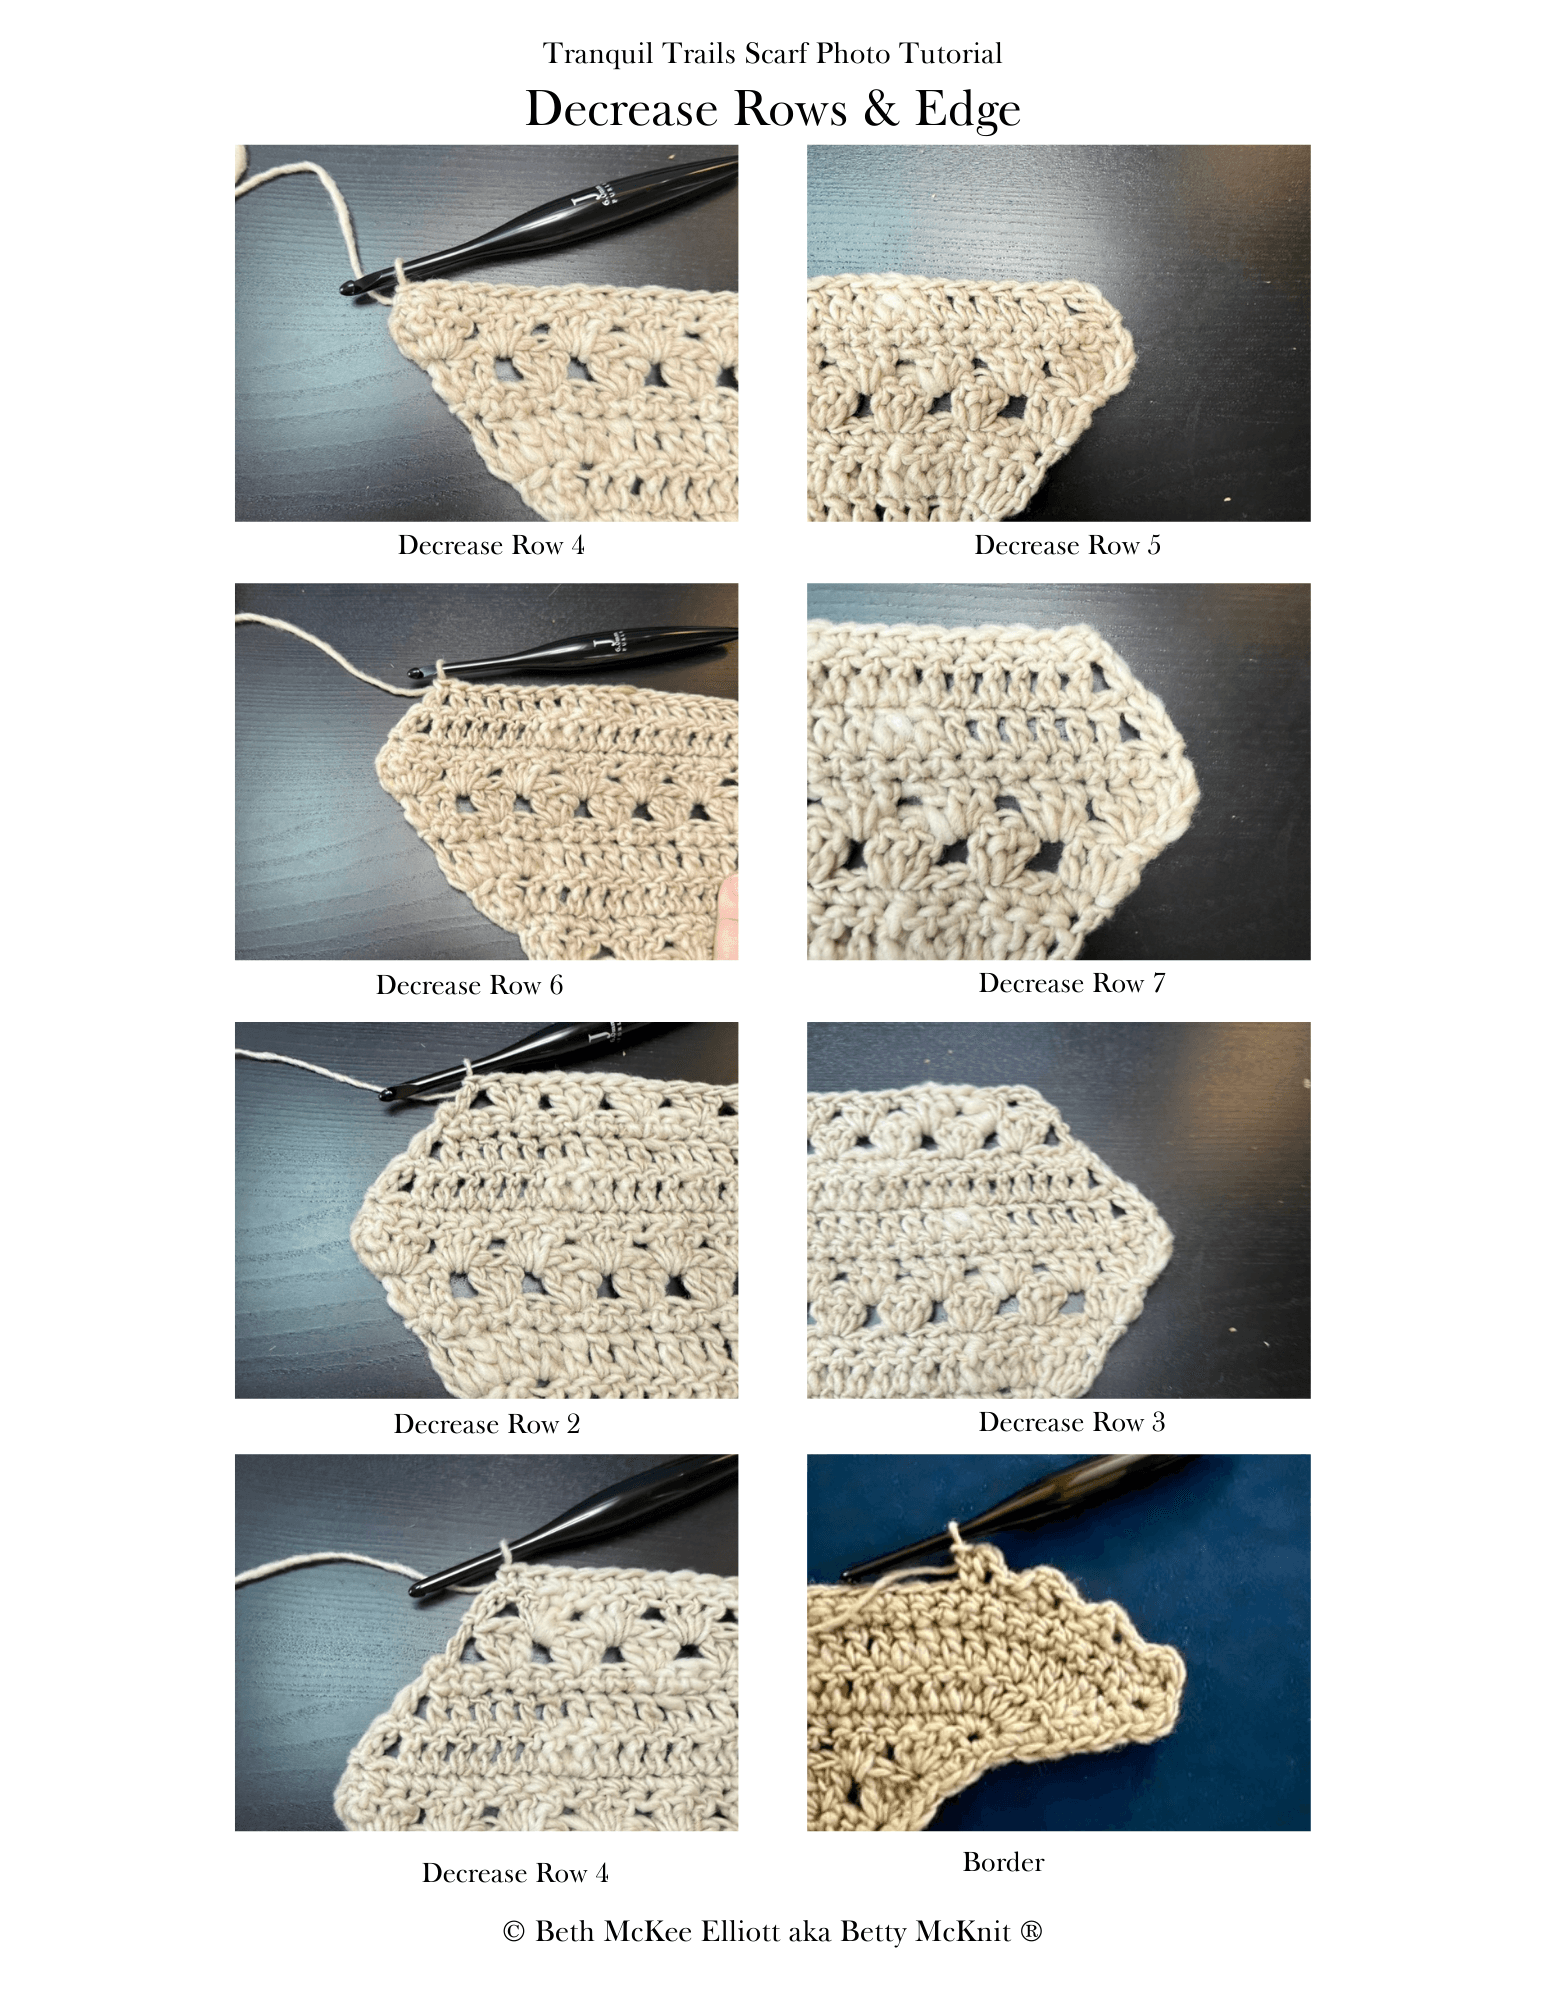
Decrease Rows
The Decrease Rows begin at Row 4.
Decrease Row 4: ch 1, 2 sc in same st, sc in next 42 sts to first dc2tog, sc2tog in next 2 sts, (mark it) sc in next 41sts to last 2 sts, sk 1 sc in last st. Turn.
<85>
Decrease Row 5: st3sc, sk 1, dc in next 39 sts to one st before marker, dc2tog over 3, pm, dc in next 40 sts to last 3 sts, 2 dc in each of next 2 sts, (dc, edc) in last st. Turn
<87>
Decrease Row 6: (st3sc, edc) in same st, 2 dc in each of next 2 sts, dc in next 42 sts to one st before marker, dc2tog over 3, pm, dc in next 37 sts to last 2 sts, sk 1, dc in last st. Turn.
<87>
Decrease Row 7: ch 1, sc in same st, sk 1, sc in next 35 sts to one st before marker, sc2tog over 3, pm, sc in next 46 sts to last st, 2 sc in last st. Turn.
<85>
Continue the Repeat sequence 2-7, picking up at Row 2.
Decrease Row 2: (st3sc, edc, dc) in same st, [sk 2, 3 dc in next st] 15 (17, 19) x to 2 sts before marker, dc3tog in marked st, pm, [sk 2, 3 dc in next] 11 (7, 3) x to last 3 sts, sk 2, edc in last st.
Turn.
<83, 77, 48>
Decrease Row 3: st3sc, sk sp bet edc and 3 dc, [3 dc in each sp] 10 (6, 2) x to sp before marker, dc3tog in next 2 sps, 3 dc 15 (17, 19) x in each sp to end, sk 2, (2 dc, 2 edc) in last st. Turn.
<82, 76, 42>
Decrease Row 4: (ch 1, 2 sc) in same st, sc in next 48 (54, 60) to first dc2tog, sc2tog in next 2 sts, (mark it) sc in next 29 (17, 5) sts to last 2 sts, sk 1 sc in last st. Turn.
<79, 73, 67>
Decrease Row 5: st3sc, sk 1, dc in next 27 (15, 3) sts to one st before marker, dc2tog over 3, pm, dc in next 46 (52, 58) each st to last 3 st, 2 dc in each of next 2 sts, (dc, edc) in last st. Turn
<81, 75, 69>
Decrease Row 6: (st3sc, edc) in same st, 2 dc in each of next 2 sts, dc in next 48 (54, 60) sts to one st before marker, dc2tog over 3, pm, dc in next 25 (13, 1) sts to last 2 sts, sk 1, dc in last st.
Turn.
<81, 75, 69>
Decrease Row 7: (ch 1, sc) in same st, sk 1, sc in next 23 (11) to one st before marker, sc2tog over 3, pm, sc in next 52 (58) sts to last st, 2 sc in last st. Turn
<79, 73>
Repeat Decrease Rows 2-7 once more, then Decrease Rows 2-6. Work the final Decrease Row
7 as follows:
Last Decrease Row 7: ch 1, sk 1, sc to last st, 2 sc in last st.
<68>
Turn, and continue to edge, if desired, or finish off.
Edge
Edge Round 1: (RS) ch 1, 2 sc in first st, sc in each st and continuing to sides of sts where the
last row 7 ends creating a continuous line across the side of the scarf to the corner.
When working sc into the sides of stitches, treat sc and dc stitches as foundation chains, working under 2 threads of each stitch and leaving one thread below, and treat the st3st as single crochet working one stitch into each.There is no set rule for how many stitches you should put into the side of each stitch. Lay your work down often and check to make sure that your edge does not ruffle (too many stitches) or pull (too few).
When you reach the center corner, work 3 sc in side of sc of first decrease row 4. Continue to work sc into sides of stitches to corner where the scarf started, work 3 sc in corner. Work sc in sides of stitches along the long side as before, working 3 sc in side of first sc of round. Do not turn.
Continue to Edge Round 2
Note: I find it perfectly acceptable to only edge the short sides of triangular scarves. It’s also perfectly fine to edge all three sides too. These directions are for putting an edge around the entire scarf. It’s your personal choice how you would like the edges of your scarf to look.
Edge Round 2: *ch 1, dc in next st, ch 1, sc in side of dc just made, sk 1, sc in next st. repeat from * around. Join with sl st to first ch 1. Fasten Off.
Weave in all ends and block.
CREDITS
This pattern was tested by Jaymi Hawkins, Anna Kendig, Jill Reece, and Deborah Shoemaker
Items created with this pattern may be used for commercial sale with credit to Betty McKnit in your listing. Mass production is not permitted.
The 6-Day Crochet stitch pattern was inspired by “Vivid Chevrons” #110 from 200 Ripple Stitch Patterns by Jan Eaton.
This pattern is the intellectual property of Beth McKee Elliott aka Betty McKnit®. This pattern, The 6-Day Kid Blanket, 6-Day Crochet™, 6-Day Star Blanket™, and all derivative works are protected by copyright. Publishing translations, corrections, variations, or tutorials of this pattern, online or elsewhere without written permission from the owner is a violation of copyright.
SEO crochet scarf pattern, triangular crochet scarf, 6-Day Crochet™ style, Noro yarn projects, chevron crochet design, light worsted weight yarn, adaptable crochet patterns, stylish crochet accessories, easy crochet projects, Halfway Home on Tranquil Trails