
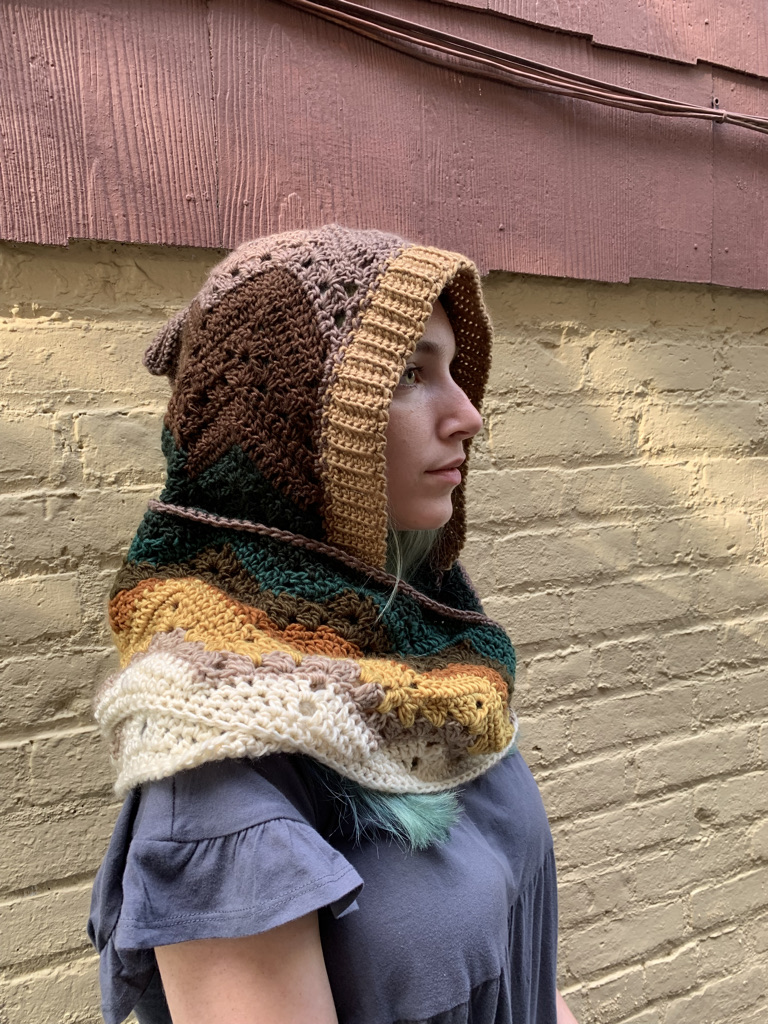
6-Day Hooded Infinity Scarf
Introduction
This is a crochet pattern for an infinity scarf with a hood using the 6-Day Kid Blanket stitches.
The pattern is worked in the round using the straight start technique. The scarf section is squared off and the hood section is continued back and forth. Ribbing is added to the edge of the hood after the hood section is squared off and seamed.
I’ve given three weights for options, this is easily resizable if you want different dimensions. See the original 6-Day Kid Blanket and my resize video for more guidance about changing sizes for the 6-Day Kid Blanket.
I truly hope you enjoy this 6-Day Kid Blanket inspired garment!
About the row numbers:
In order to provide consistency across all of the 6DKB pattern variations, I’ve numbered the rows to correspond to the original 6-Day Kid Blanket pattern. The cluster rows are always Row or Round 2 and 3, the dc rows are always Row or Round 5 and 6, and the sc rows are always Row or Round 4 and 7. This makes it easy to adapt any pattern to the Snowflake Effect, Half Snowflake, Popsicle, or the original Vivid Chevrons.
You will be guided to work the rows in the proper order; don’t let the numbers throw you off or overthink a change in the sequence.
Finished Measurements: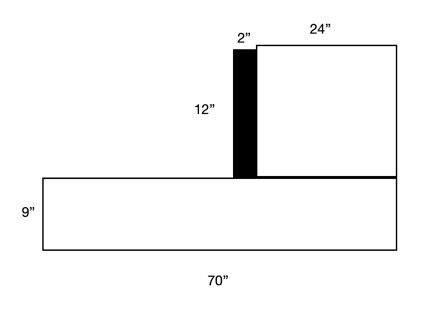
Total width = @70”
Hood section is 24” w (before seaming) and 12” long
Scarf section length 9”
Total Length = 21”
Materials:
6- Super Bulky
600 Yards
Hook 10 mm Furls Odyssey
9 Points, 1/2 repeat
Hood Section – 3 points
Gauge 7 sts & 8 rows over 4” in sc
4- Worsted
800 Yards
Hook: 6.5 mm Furls Odyssey
14 points, 1.5 repeats
Hood Section: 4 points
Gauge 3 st/in & 2.5 rows/in
3- DK
1200 Yards Shown in Lion Brand Mandala Roving
Hook: 5mm Furls Odyssey
20 points, 2.5 repeats
Hood Section: 6 points
Gauge 3.5 st/in & 4 rows/in
Size: One Size
Skill Level: Easy
Abbreviations:
blo: back loop only
ch: chain
dc: double crochet
dc3tog: (NOT TO BE CONFUSED WITH dec dc3tog).
Work dc3tog into one stitch – not over three stitches
[yarn over, pull up a loop, pull through two loops] 3 times. Yarn over, and pull through all 4 loops on the hook. (Be sure to pull up a loop in the same stitch every time.) dc3tog complete.
fsc: foundation single crochet
rep: repeat
hdc: half double crochet
pm: place or pass marker
sc: single crochet
sk: skip
sp(s): space(s)
Instructions are given for 3 weight with (4 and 6) in parentheses.
 Begin Pattern
fsc 260, (182, 117) (do not chain – use fsc).
Join the work in the round and work round 1 starting in the first fsc stitch. Do not join with a sl st at the end of the round unless instructed to do so, just continue to the next round. Place a marker in the first sc of round 1 to keep track if you need to. When you weave in your ends, weave the starting tail across the gap using invisible join and you’ll never know where your round started and ended.
Setup Round 1: 3 sc, 6 hdc, *7 sc, 6 hdc, repeat from * to last 4 st, 4 sc.
Setup Round 2: (continuing from the previous round) sc, *3 hdc, 2 dc, ch 2, 2 dc, 3 hdc, sc, sl st, sc, repeat from * to last 2 sts, sc, sl st.
Setup Round 3: Sc, *3 hdc, 2 dc, dc ch 2 dc in ch sp, 2 dc, 3 hdc, sc, sl st, sc, repeat from * around, ending with sl st.
Setup Round 4: *7 sc, 3 sc in ch sp, 7 sc, sk 1, repeat from * around. Join to first sc w sl st.
You will be guided to work the rows in the proper order; don’t let the numbers throw you off or overthink a change in the sequence. You’ll proceed from Setup Row 4 to Row 2. Trust the pattern, it works!
Round 2: sl st in next 2 st, ch 2, dc2tog in same st. *sk next 2 sc, 3dc into next sc, sk next 2 sc, [3dc, ch 3, 3 dc] in next st, sk 2, 3 dc into next st, sk 2, dc3tog, sk next 4 sc, dc3tog, repeat from * around, sl st into top of dc2tog at beginning of round.
Round 3: sl st into sp between dc2tog and 3 dc, ch 2, dc2tog in same sp. 3 dc into next sp
[3dc, ch3, 3dc] into next ch-3 sp *3 dc into next sp, dc3tog into next sp
sk next sp, dc3tog into next sp, 3 dc into next sp, [3dc, ch3, 3dc] into next ch- 3 sp
rep from * around, sl st into top of dc2tog.
Round 4: ch 1, sc in same sp (mark this st so you know where to join at the end of the round, as joining into the sl st or the ch 1 will create extra sts and problems), 1 sc into each of next 6 dc
*3 sc into next ch 3 sp, 1 sc into each of next 14 sts, repeat from * to end. sl st into sc at beginning of round (where your marker is).
For 6 Weight, skip the next three rounds and go directly to square off rounds.
Round 5: sl st, ch 3, 6 dc, *3 dc in next st, 7 dc, sk 2, 7 dc, rep from * around sl st into top of ch 3 at the start of the round.
Round 6: sl st, ch 3, 6 dc, *3 dc in next st, 7 dc, sk 2, 7 dc, rep from * around, sl st into top of ch 3 at the start of the round.
Round 7: Ch 1, sc in same sp (mark this st), sc around, sl st into first sc of round.
Repeat rounds 2-7 once more.
Repeat rounds 2-4
If you haven’t already, mark the beginning of the round in the center st. of the valley, and place another marker at the center stitch of the valley on the other side of 6 (4, 3) points. Begin squaring off the larger 2/3 section of the piece while continuing the established pattern on the smaller hood section.
Square off Scarf Section Round 1: sl st, ch 3, 6 dc, *3 dc in next st (center sc), 7 dc, sk 2, 7 dc, rep from * to last point before marker, 3 dc in next st, 7 dc, sk 2 passing the marker, 2 dc, 3 hdc, 2 sc, sl st, 2 sc, *3 hdc 2 dc, sk 2, 2 dc, 3 hdc, 2 sc, sl st, 2 sc, Repeat from * to 6 sts before the marker, 3 hdc, 2 dc, sk 2 passing the marker, sl st into top of ch 3 at the start of the round.
Square off Scarf Section Round 2: sl st, ch 3, 6 dc, *3 dc in next st, 7 dc, sk 2, 7 dc, rep from * to last point before marker, 3 dc in next st, 7 dc, sk 2 passing the marker, 2 dc, 3 hdc, sc, sl st, sc, *3 hdc, 2 dc, sk 2, 2 dc, 3hdc, sc, slst, sc. Repeat from * to last 8 sts, 3 hdc, 2 dc, sk 2 passing the marker, sl st into top of ch 3 at the start of the round.
Square off Scarf Section Round 3: Ch 1, sc in same sp (mark this st), sc across to marker, do not skip, 3 hdc, 7 sc, *6 hdc, 7 sc repeat from * until 3 st before the marker, 3 hdc, do not sk, sl st in marked sc at the start of the round.
Continue on to the hood section, which is worked back and forth.
Hood Setup Row (slightly different from regular Row 2): ch 3, sk 1, [3 dc in next sc, sk 2] twice, [3 dc, ch 3, 3 dc] into next sc *sk 2, 3 dc into next sc, sk 2, dc3tog, sk 4, dc3tog, sk 2, 3 dc in next sc, sk 2, [ 3 dc, ch 3, 3 dc] into next sc; rep from * to last point on hood section, sk 2, 3 dc into next sc, sk 2, 3 dc in next sc, sk 1, dc in next sc (you should be at the marker).
Turn
Don’t be confused by the row numbers, they correspond to the original 6dkb to help you make the striping effect of your choice. If you are familiar with the 6DKB, you’ll recognize the next six rows.
Hood Row 3: ch 3, sk sp between turning ch and next 3-dc group, 3 dc into each of next 2 sp
[3dc, ch3, 3dc] into next ch-3 sp
*3 dc into next sp, dc3tog into next sp
sk next sp, dc3tog into next sp, 3 dc into next sp, [3dc, ch3, 3dc] into next ch- 3 sp
rep from * to last 3 sps, 3 dc into each of next 2 sps
1 dc into sp between last 3 dc group and turning ch.
Turn
Hood Row 4: ch 1, sc into first st (the one right below your turning chain)
sk 1, sc into each of next 8 dc, *3 sc into next ch 3 sp, 14 sc, repeat from * to last ch 3 sp, 3 sc into last ch-3 sp, 8 sc, sk 1, sc into top of ch 3.
Turn
Hood Row 5: Ch 3, sk first 2 sc of the row below (the sc your turning chain is coming out of counts as the first one). 8 dc, *3 dc into next sc (you should be working these into the center stitch of the 3 sc. If not, you may have skipped incorrectly in the beginning of the row.) 7 dc, sk 2, 7 dc,
rep from * to last 11 sc, 3 dc into next sc, 8 dc, sk 2, dc into the turning ch.
Hood Row 6: Ch 3, sk first 2 dc in the row below (the dc below your turning chain counts as 1)
1 dc into each of next 8 dc
*3 dc into next dc (you should be working into center stitch of 3 dc)
1 dc into each of next 7 dc, sk next 2 dc, 1 dc into each of next 7 dc
rep from * to last 10 dc
3 dc into next dc, 1 dc into each of next 8 dc, sk last dc, 1 dc into 3rd st of ch 3, turn.
Hood Row 7: Ch 1, sc into first dc (the same one the turning chain is coming out of), sk 1 dc, 1 sc into each dc along row to last dc sk last dc, 1 sc into 3rd ch of ch 3, turn.
The sequence repeats beginning with Row 2 as follows:
Hood Row 2: ch 3, sk first 3 sc (the sc on the end of the row, the one below your turning chain counts as 1)
[3dc in next sc, sk next 2 sc] twice, [3 dc, ch 3, 3 dc] into next sc
*sk next 2 sc, 3dc into next sc, sk next 2 sc, dc3tog
sk next 4 sc, dc3tog, sk next 2 sc, 3 dc in next sc, sk next 2 sc
[ 3 dc, ch3, 3 dc] into next sc; rep from * to last 9 sc
sk next 2 sc [3 dc into next sc, sk next 2 sc] twice, 1 dc into last sc.
Repeat Hood Rows 2-7 3 (2, 0) times more (for a total of 4 (3, 1) repeats).
Repeat Hood Rows 2-4.
Square off the top of the hood.
 Square off Row 1:
After Completing Row 4, Turn
Ch 3, counting the stitch under the turning chain, sk 2, 3dc, 3 hdc, 2 sc, sl st, 2 sc
*3 hdc 2 dc sk2 2 dc, 3 hdc, 2 sc sl st, 2 sc
Repeat from * to last 8 sts, 3 hdc, 3 dc, sk 1, dc in last sc.
Turn
Square off Row 2:
Ch 3, counting the stitch under the turning chain, sk 2, 3dc, 3 hdc, sc, sl st, sc
*3 hdc, 2 dc, sk 2, 2 dc, 3 hdc, sc, sl st, sc
Repeat from * until 8 sc remain on the row below
3 hdc, 3 dc, sk 1, dc in last sc.
Turn
Square off Row 3
Ch 3, sk 2 (counting the stitch below the turning chain), 3 hdc, 7 sc, *6 hdc, 7 sc* until 5 st remain, 3 hdc, sk 1, hdc in last stitch
Turn
Square off Row 4:
Ch 1, sc across. Fasten off, leaving a long tail for seaming the hood.
Fold the top of the hood in half and seam the top edges together. Fasten off.
Hood Ribbing
Edge Round: With right side facing, join yarn to the right front edge of the hood where it joins the scarf. Working into the sides of the dcs, scs, and turning ch along the side edge of the hood rows, sc across to the where the hood meets the scarf on the other side, sk 1, continue across the top edge of the scarf working 1 sc in each stitch of scarf, sk the last st and join with a sl st to the first sc of the round.
Hood Ribbing Row 1: Ch 7 (or any number depending on how long you would like your ribbing)
Turn and work in towards the hood edge sc row.
Hood Ribbing Row 2: sk 1, 6 sc. Working into the sc sts that you made into the hood edge, sl st in the next two sts.
Turn
Hood Ribbing Row 3: Sk 2 sl sts, sc across, working into the blo.
Turn
Hood Ribbing 4: Work as Row 2 working into the blo.
Turn
Repeat Hood Ribbing Row 3 and 4 until the work reaches the last sc on the edge. Fasten off.
Seam the ribbing edges to the scarf.
Weave in all ends
Join us in the 6-Day Kid Blanket Facebook Group for help with this pattern and to show off your finished creations. Be sure to tag @bettymcknit in your social media posts
This pattern contains affiliate links. If you click these links and buy something on the page they take you to, I may, at no additional cost to you, earn a commission. I only affiliate with products and companies I feel good about. Thank you for your support!
This pattern is 100% original and the intellectual property of Betty McKnit/Beth Elliott. This pattern, The 6-Day Kid Blanket, “6DKB” and derivative works are also protected by copyright. Publishing translations, corrections, variations, or tutorials of this pattern, online or elsewhere without written permission from the owner is a violation of copyright.
The stitch pattern is “Vivid Chevrons” #110 from 200 Ripple Stitch Patterns by Jan Eaton.
Reprinted with permission from Quarto Publishing