
The 6-Day Popsicle Blanket
A variation of the classic crochet pattern the
6-Day Kid Blanket by Betty McKnit
Popsicle Effect concept by Jeana Lynn Roberson
Pattern by Betty McKnit
Introduction:
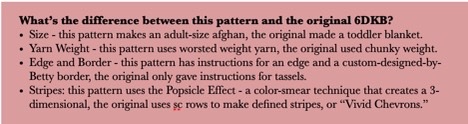
This pattern is a variation of the 6-Day Kid Blanket (6DKB) and makes an “adult-sized” blanket. To achieve the 3D color popping stripes we have altered the original pattern to change colors on different rows than the original 6DKB. There are a variety of ways to alter the look of the 6DKB by changing colors on different rows, and this particular variation is known as the Popsicle Effect. Many thanks to Jeana Roberson for this dramatic variation.
I’ve created my own custom border based on ideas I found in Edie Eckman’s book “Around the Corner Crochet Borders” and “Every Which Way Crochet Borders.”
Details:
US Terminology
Finished Size: 50 x 60” throw
Skill Level: Easy
Materials:
Yarn: 340 yards of (4) worsted weight yarn in five colors.
Choosing yarn for the “POP” sicle effect.
You will need five colors of yarn ranging in tone from white to very dark. Suggested sequence of white, off-white, light grey, dark grey, and then a darker color of your choice. The most important part of this technique is that Color A and B are very highly contrasted since that is what creates the “pop” effect. The tone of the remaining three colors should graduates from dark to light
If you aren’t sure if your chosen colors contrast well, take a photo of your yarn choices and convert the photo to black and white (reduce saturation to 0) using a photo editor. If your yarn graduates from light to dark, then your colors should work fine. If any of them look like the same color of grey, you may not get as dramatic of an effect.
Here is the color way shown in this pattern along with two other color ways that I swatched. At right you can see the black and white photos showing the different tones.
 Suggested Colors: 340 yards (2 skeins) of each of the following
Color A: Linen (shown: Vanna’s Choice #099 – Linen) Beige)
Color B: Brick Red (shown in Vanna’s Choice #133 Brick)
Color C: Rust Orange (shown in Vanna’s Choice #135 Rust)
Color D: Gold: (shown in Vanna’s Choice # 130 Honey)
Color E: Beige (shown in Vanna’s Choice #123
Other options:
 Color A: White (shown in Vanna’s Choice White #100)
Color B: Dark Purple (shown in Vanna’s Choice Purple #147)
Color C: Dusty Purple (shown in Vanna’s Choice Dusty Purple #146)
Color D: Grey: (shown in Vanna’s Choice Silver Grey #149)
Color E: Linen (shown: Vanna’s Choice Linen #099)
 Color A: White (shown in Vanna’s Choice White #100)
Color B: Navy (shown in Vanna’s Choice Navy #110)
Color C: Bright Blue (shown in Vanna’s Choice Colonial Blue #109)
Color D: Sky Blue: (shown in Vanna’s Choice Sky Blue #111)
Color E: Light Blue (shown: Vanna’s Choice Silver Blue #105)
Hook: J (6 mm)
(make a swatch to determine the best hook for your yarn).
(see chart on last page for help making a blanket of a different size with a different weight of yarn)
Gauge: 12 st and 7 rows over 4” in DC
– My 37 st swatch was 9.5” wide and 7” long
Abbreviations:
ch: chain
dc: double crochet
dc3tog: (NOT TO BE CONFUSED WITH dec dc3tog).
Work dc3tog into one stitch – not over three stitches
[yarn over, pull up a loop, pull through two loops] 3 times. Yarn over, and pull through all 4 loops on the hook. (Be sure to pull up a loop in the same stitch every time.) dc3tog complete.
hdc: half double crochet
rep: repeat
sc: single crochet
sk: skip
sp(s): space(s)
Special Stitches:
camel stitch: hdc in third loop
picot: sc, ch 3, sc in side of sc just made. Picot complete.
Some things to consider before you start:
Does it really only take 6 Days to make?
It’s definitely possible! This variation on the 6DKB uses the very same stitches as the original, but uses a different weight yarn and is much larger and therefore will probably take you longer than six days to make. The original toddler blanket made with chunky yarn honestly only took six days.
 First timers
If this is your first time making a 6-Day Kid Blanket, before you begin, I suggest you make a swatch on 37 chains while following along with my video tutorials on my YouTube Channel. I know you probably never swatch and will be tempted to bypass this advice, but take my word for it. The first few rows are a little tricky and you’ll sidestep common mistakes and avoid the frustration of frogging hours of hard work by swatching along with my tutorials before starting your blanket. I also have a Facebook Group and a Membership Community to help you if you get stuck.
How to Resize
This pattern creates an adult-sized 50×60” throw sized blanket. If you would like make this blanket in a different size, please make a swatch and measure it and use the chart at the end of this pattern as well as my 6DKB Resize Video to figure out your starting chain and yardage.
Stripe Symmetry
Remember that the blanket ends on row 4 and therefore has an extra half repeat at the top. The edge and border will not be as effective if you finish on row 7.
Side edges:
Some crocheters have had issues with the side edges of their blankets curling. Here are some steps you can take to help alleviate this:
- ch 4 at the beginning of the row where the instructions say to ch 3. This is something you should try in your swatch, as some crocheters with tighter tension find that they really do need that extra stitch. Others do fine without it.
- Replace the dc at the end of each or every other dc row with extended double crochet (edc)
Keep in mind when adding additional stitches on the edge you may need to skip stitches when working along the sides to get your edges to lie flat. There is no exact formula for how many sc to work into the edge. Use your judgement and lay it down often and check it as you are working.
- When working the last stitch of the row, insert the hook from back to front, instead of from front to back.
- Work an edge into the turning chains and sc/dc stitches on the sides of the work as described at the end of this pattern, rather than into the spaces.
- Wash your blanket once it is complete, and lay it out flat to dry, gently stretching and shaping the edges.
Changing Colors:
No two 6-Day Blankets are alike. The pattern can take on many different looks depending on which rows the color changes fall on. For this blanket we are using color to create a 3D effect known in the 6-Day Kid Blanket Group as the “Popsicle Effect.” This effect was created and coined by Jeana Lynn Roberson. She uses a “color smear” technique to make the granny cluster rows of crochet POP.
To change yarn on color changes, draw the new color through the last two loops of the last stitch of the row before the color change.
This blanket changes colors on nearly every row. There is not a way to carry the colors and avoid weaving ends. I do not recommend magic knot or any other kind of join – weaving in the ends is the most secure way to finish your blanket.
 Creating a straight top and bottom edge:
This version creates a chevron top and bottom edge. If you would like a straight top and bottom edge, you will have to make alterations not given in this pattern. Please see my website articles “How to start your 6-Day Kid Blanket with a Straight Edge” and “6DKB Straight Start Questions Answered.” Be sure to account for extra yardage.
Begin
With Color E, ch 190
(To make your blanket larger or smaller, chain a multiple of 17 + 3)
Row 1: (RS) 1 sc into 2nd ch from hook, 1 sc into each ch to end.
Turn
Change to Color A
Row 2: ch 3, sk first 3 sc (the sc on the end of the row, the one below your turning chain counts as 1)
[3dc in next sc, sk next 2 sc] twice, [3 dc, ch 3, 3 dc] into next sc
*sk next 2 sc, 3dc into next sc, sk next 2 sc, dc3tog
sk next 4 sc, dc3tog, sk next 2 sc, 3 dc in next sc, sk next 2 sc
[ 3 dc, ch3, 3 dc] into next sc; rep from * to last 9 sc
sk next 2 sc [3 dc into next sc, sk next 2 sc] twice, 1 dc into last sc.
Turn
Change to Color B
Row 3: ch 3, sk sp between turning ch and next 3-dc group, 3 dc into each of next 2 sp
[3dc, ch3, 3dc] into next ch-3 sp
*3 dc into next sp, dc3tog into next sp
sk next sp, dc3tog into next sp, 3 dc into next sp, [3dc, ch3, 3dc] into next ch- 3 sp
rep from * to last 3 sps, 3 dc into each of next 2 sps
1 dc into sp between last 3 dc group and turning ch.
Turn
Row 4: ch 1, sc into first dc of the row (the one right below your turning chain)
sk next dc, 1 sc into each of next 8 dc
*3 sc into next ch 3 sp, 1 sc into each of next 14 sts
repeat from * to last ch-3 sp, 3 sc into last ch-3 sp
1 sc into each of next 8 dc, sk next dc, 1 sc into 3rd st of ch 3.
Turn
Change to Color C
Row 5: Ch 3, sk first 2 sc of the row below (the sc your turning chain is coming out of counts as the first one). 1 dc into each of next 8 sc
*3 dc into next sc (you should be working these into the center stitch of the 3 sc. If not, you may have skipped incorrectly in the beginning of the row.) 1 dc into each of next 7 sc
sk next 2 sc, 1 dc into each of next 7 sc
rep from * to last 11 sc, 3 dc into next sc, 1 dc into each of next 8 sc
sk next 2 sc, 1 dc into the turning chain from the row below.
Turn
Change to Color D
Row 6: Ch 3, sk first 2 dc in the row below (the dc below your turning chain counts as 1)
1 dc into each of next 8 dc
*3 dc into next dc (you should be working into center stitch of 3 dc)
1 dc into each of next 7 dc, sk next 2 dc, 1 dc into each of next 7 dc
rep from * to last 10 dc
3 dc into next dc, 1 dc into each of next 8 dc, sk last dc, 1 dc into 3rd st of ch 3, turn.
Change to Color E
Row 7: Ch 1, sc into first dc (the same one the turning chain is coming out of), sk 1 dc
1 sc into each dc along row to last dc
sk last dc, 1 sc into 3rd ch of ch 3, turn.
Change Back to Color A
Repeat rows 2-7 fourteen times, for a total of 15 repeats of the pattern, working color changes as follows: Row 2 – Color A, Row 3 – Color B, Row 4 – Color B, Row 5 – Color C, Row 6 – Color D and Row 7 Color E.
Repeat rows 2-4 one time more time, with color changes as before. The blanket ends on Row 4.
Fasten off.
 Edge Round 1: Join Color E in any stitch, work a row of sc around the blanket, working 3 sc into each corner and every point on the top and bottom of the blanket.
When working sc into the sides of the blanket, use the turning chains, the sc and dc stitches as foundation chains, working under 2 threads of each stitch and leaving one thread below.
There is no set rule for how many stitches you should put into the side of each stitch. If you chained 4 to turn or did edc so that your edges would not curl, you probably will have to skip some stitches periodically. Find out what works for your tension. Lay your work down often and check to make sure that your edge does not ruffle (too many stitches) or pull (too few).
Join with a sl st to the first stitch. Fasten off.
Edge Round 2: Join Color D with standing hdc to any stitch along the side of the work.
I like to start new rounds in different places so that I don’t have a bunch of ends lines up in one area of the work. You can start anywhere on either side; pick a new place each time.
hdc around, working 5 dc each corner and peak over the first sc round and into the blanket edge below Edge Round 1. sk 2 in each valley. Join w sl st to first hdc. Fasten off.
Edge Round 3: Join Color C with standing hdc to any third loop along the side of the work. Camel st until you reach the last hdc before the 5 dc corner, work [dc, ch 1] 5 x starting in the last hdc and across 5 dc, dc in next hdc, resume camel st around, sk 2 in each valley, and working all peaks as corners.
Fasten off.
Edge Round 4: Join Color B with standing hdc to any side st. Camel st to the last hdc before the first corner dc, sc, [picot, sc] in sps between the dcs on the corner (5 picots made), sc in next hdc, resume camel st, skipping 2 in each valley, and working peaks as corners.
Join with sl st to first hdc. Fasten off.
Weave in all ends.
Resources
There are resources to help you make this pattern.
- 6-Day Kid Blanket Cheat Sheet and Coloring Page
- 6-Day Viral Kid Blanket Graph
- 6-Day Kid Blanket tutorials on YouTube
- 6-Day Kid Blanket Facebook Group
- The Betty McKnitiverse
