6DKB Sideways Pocket Shawl
The 6-Day Kid Blanket Variation
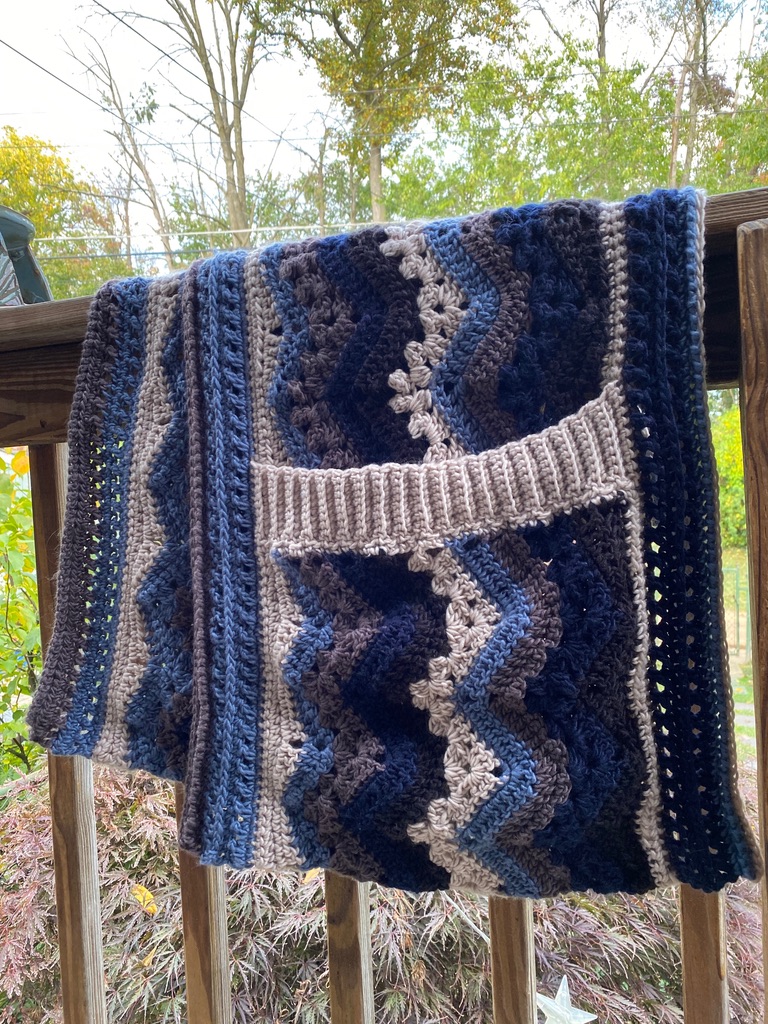
Betty’s Sideways Pocket Shawl
This project is for a pocket shawl in the 6-Day Kid Blanket pattern. The shawl is created sideways with a straight start, and the chevrons are built up from the chain. The pockets are crocheted as additional width which will be folded up before working the border.
Finished length: 60” (variable)
Total length before pockets are folded up: 84” (variable)
Width: 16-18”
This project can be worked in three weights of yarn:
DK (3) = 23 points
20 oz/1600 yards
5.5 mm hook
Worsted (4) = 20 points
30 oz/2000 yards
6 mm hook
 Shown in Lion Brand Mandala Roving
4 cakes (1600 yards)
US I/5.5 mm hook (treat yourself to Bettyʻs Favorite Furls Odyssey)
Bulky (5) = 14 points
1000 yards
M/8 mm hook
Bulky Shawl shown in (discontinued) Lion Brand Woolease Chunky.
Substitution: Hue and Me, or Color Made Easy
A word about sizing:
The measurements and starting chains given are options. For perfect sizing, make a swatch and do the math for the shawl of your size.
This shawl fits me. I am 60” tall and this scarf is 60” long. It seems like a good finished length will be somewhere around the height or wingspan of the wearer (often these measurements are pretty close to the same). You will need to chain 18-24” of additional length for the pockets. If you would like to lengthen your shawl, take your height or wingspan measurement and add 18-24” to that to calculate your starting chain.
To add points or repeats to this pattern, add 13 sts for each additional point, plus 4. You can also add length by increasing the length of the pocket ribbing, and adjust the total length and pocket depth by folding up more or less of the ends for the pocket.
To resize this pattern for a different weight of yarn than what is listed, make a swatch, and figure out how many points you need for for your chosen length.
Chain 13 x (# of points needed) + 4.
Here is a resize video for the 6DKB swatch which may be helpful to you.
There is an option to add rows to the side edges to make the shawl wider. Keep in mind that if you make your shawl wider, you may also want to add a little length to it.

Color Changes:
This pattern does not give color changes. The 6-Day Kid Blanket can take on many different looks depending on where you change colors. Here is an article to help you decide how to stripe your shawl. Cake yarn looks amazing in this pattern as well, choose your favorite color way and “let it flow.”
First time making the 6-Day Kid Blanket Pattern?
I highly recommend that you swatch on 37 sts following this pattern and my YouTube videos.
Abbreviations:
ch: chain
dc: double crochet
dc3tog: (NOT TO BE CONFUSED WITH dec dc3tog).
Work dc3tog into one stitch – not over three stitches
[yarn over, pull up a loop, pull through two loops] 3 times. Yarn over, and pull through all 4 loops on the hook. (Be sure to pull up a loop in the same stitch every time.) dc3tog complete.
rep: repeat
crossed dc = crossed double crochet
*sk next st, dc, dc in skipped stitch. Repeat from *
fsc: foundation single crochet
rsc: reverse single crochet
sc: single crochet
sk: skip
sp(s): space(s)
tw sc: twisted single crochet alternative to rsc
Begin Pattern:
Directions are given for DK weight with Worsted and Bulky in parenthesis.
This blanket starts with a straight edge. I recommend making your chain with a hook 1 full mm larger than the hook you plan to work your project with. You can also instead start with fsc, in which case you will need one fewer chain than given, and can skip Setup Row 1.
Ch 303 (264, 186) (multiple of 13 +4)
Place stitch markers along your chain every 20 stitches to help keep you from losing count.

Setup Row 1: starting in second ch from hook, sc across.
Turn
From this row forward, work the last stitch of each row by inserting your hook from the back of the work to the front in order to alleviate the edges of your work curling.
Setup Row 2: ch 1, 5sc, *6 hdc, 7sc, repeat from * to last 5 st, 5 sc.
Turn
Setup Row 3: ch 1, 3 sc, *3 hdc, 2dc, ch 2, 2 dc, 3 hdc, sc, sl st, sc, repeat from * to last 3 st, 3 sc.
Turn
 Setup Row 4: ch 1, 3 sc, *3 hdc, 2 dc, [dc, ch 1, dc] in ch 2 sp, 2 dc, 3 hdc, sc, sl st, sc, repeat from * to last 3 st, 3 sc.
Turn
Setup Row 5: ch 1, sc, sk 1, 7 sc, *3 sc in ch sp, 7 sc, sk 1, 7 sc, repeat from * to last 9 st, 7 sc, sk 1, sc in last st.
Turn
The next 6 rows are from the 6-Day Kid Blanket. The row counts are 2-7 in order to match the original pattern. Proceed to 6DKB Row 2 from here:
6DKB Row 2: ch 3, sk first 3 sc (the sc on the end of the row, the one below your turning chain counts as 1)
[3dc in next sc, sk next 2 sc] twice, [3 dc, ch 3, 3 dc] into next sc
*sk next 2 sc, 3dc into next sc, sk next 2 sc, dc3tog
sk next 4 sc, dc3tog, sk next 2 sc, 3 dc in next sc, sk next 2 sc
[ 3 dc, ch3, 3 dc] into next sc; rep from * to last 9 sc
sk next 2 sc [3 dc into next sc, sk next 2 sc] twice, 1 dc into last sc.
Turn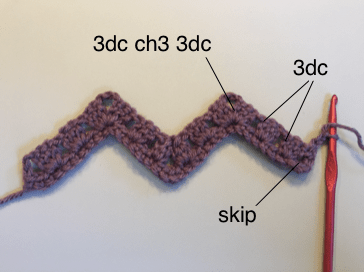
6DKB Row 3: ch 3, sk sp between turning ch and next 3-dc group, 3 dc into each of next 2 sp
[3dc, ch3, 3dc] into next ch-3 sp
*3 dc into next sp, dc3tog into next sp
sk next sp, dc3tog into next sp, 3 dc into next sp, [3dc, ch3, 3dc] into next ch- 3 sp
rep from * to last 3 sps, 3 dc into each of next 2 sps
1 dc into sp between last 3 dc group and turning ch.
Turn
6DKB Row 4: ch 1, sc into first dc of the row (the one right below your turning chain)
sk next dc, 1 sc into each of next 8 dc
*3 sc into next ch 3 sp, 1 sc into each of next 14 sts
repeat from * to last ch-3 sp, 3 sc into last ch-3 sp
1 sc into each of next 8 dc, sk next dc, 1 sc into 3rd st of ch 3.
Turn
6DKB Row 5: Ch 3, sk first 2 sc of the row below (the sc your turning chain is coming out of counts as the first one). 1 dc into each of next 8 sc
*3 dc into next sc (you should be working these into the center stitch of the 3 sc. If not, you may have skipped incorrectly in the beginning of the row.) 1 dc into each of next 7 sc
sk next 2 sc, 1 dc into each of next 7 sc
rep from * to last 11 sc, 3 dc into next sc, 1 dc into each of next 8 sc
sk next 2 sc, 1 dc into the turning chain from the row below.
Turn
6DKB Row 6: Ch 3, sk first 2 dc in the row below (the dc below your turning chain counts as 1)
1 dc into each of next 8 dc
*3 dc into next dc (you should be working into center stitch of 3 dc)
1 dc into each of next 7 dc, sk next 2 dc, 1 dc into each of next 7 dc
rep from * to last 10 dc
3 dc into next dc, 1 dc into each of next 8 dc, sk last dc, 1 dc into 3rd st of ch 3.
Turn
6DKB Row 7: Ch 1, sc into first dc (the same one the turning chain is coming out of), sk 1 dc
1 sc into each dc along row to last dc
sk last dc, 1 sc into 3rd ch of ch 3.
Turn
Repeat 6DKB Rows 2-7 1 (1, 0) times.
Repeat 6DKB rows 2-4 one time.
Square the top edge:
 Square off Row 1: ch 3, counting the stitch under the turning chain, sk 2, 3 dc, 3 hdc, 2 sc, sl st, 2 sc
*3 hdc, 2 dc, sk 2, 2dc, 3 hdc, 2 sc, slst, 2 sc, repeat from * to last 8 sts, 3 hdc, 3 dc, sk 1, dc in last sc.
Turn
Square off Row 2: ch 3, counting the stitch under the turning chain, sk 2, 3 dc, 3 hdc, sc, sl st, sc, *3 hdc, 2 dc, sk 2, 2 dc, 3 hdc, sc, slst, sc, repeat from * to last 8 sts, 3 hdc, 3 dc, sk 1, dc into turning ch.
Turn
Square off Row 3: ch 3, counting the stitch below the turning chain sk 2, 3 hdc, 7 sc, *6 hdc, 7 sc* until 5 st remain, 3 hdc, sk 1, hdc in last st.
Turn
Square off Row 4: ch 1, sc in same st and in each st across, working three sc in last corner st. Do not turn or fasten off. Continue to Pocket Edge Row 1.
Pocket Edge Row 1: Keeping same side facing, work a row of sc down the sides using the turning chains and the dc stitches as foundation chains, working under 2 threads of each stitch and leaving one thread below. Check your work often to make sure it is lying flat and adjust the number of stitches as needed.
Try on your pocket shawl and make some decisions about length. You can adjust the length of the completed project by folding up more or less of the ends of the work for you pocket. You can also add length to the pocket by making a wider rib band on the top of the pocket.
 Work a ribbed edge as follows:
https://www.youtube.com/watch?v=xsEPLeUSwmg
Ch 10 (increase this to add length if needed.)
Turn and work in towards the pocket edge.
Pocket Edge Row 2: sk 1, 9 sc. Working into the sc sts of Pocket Edge Row 1, sl st in the next two sts.
Turn
Pocket Edge Row 3: Sk 2 sl sts, sc across, working into the BLO.
Turn
Pocket Edge 4: Work as Row 2 working into the BLO.
Turn
Repeat Pocket Edge Row 3 and 4 until the edge reaches the last pocket row.
Fasten off.
When working your edge, I chose to skip on stitch along the pocket edge every few rows to make my pocket edging gather a little tighter. This is a wide pocket and we donʻt want it to flop open.
Taking care to work from the right side (check your other pocket edge and work on the right side of Pocket Edge Row 1) attach yarn to other end of the scarf and, and repeat Pocket Edge Rows 1-4.
Create pockets and edge:
Fold up approximately 12 inches (or the desired length of your pocket) on each end and use stitch markers to attach each corner of the pocket to the top and bottom edge of the scarf. Be sure fold the pockets so that the right side of Pocket Edge Row 1 is on the outside of the scarf. Line up the sides of the pocket to the side of the scarf stitch by stitch, and use stitch markers to hold the pocket in place.
Edge Row 1: Starting at one corner, with right side facing, work a row of single crochet through both layers of the pocket and the edge, continue across the body of the scarf, and then when you reach the next corner of the pocket, work through both layers again.
Turn
Edge Row 2: ch 3, dc, crossed dc to last st, dc.
Turn
Edge Row 3: ch 2, hdc across.
Turn
Edge Row 4: ch 3, working into third loop of hdc, dc, crossed dc to last st, dc.
Turn
Edge Row 5: ch 2, hdc across.
(Repeat or eliminate rows 4 and 5 to adjust the width of your shawl.)
Edge Row 6: Do not turn. Working into third loop of hdc, rsc across.
(Alternatively, you can turn the work after Edge Row 5 and work tw sc in the third loop across the row, and turn.)
Repeat Edge Rows 1-6 on the other side.
Fasten off.
Weave in all ends.
Add a button to the center front of the scarf and to the pockets, if desired.
Add fringe to the bottom, if you want some.
For questions about this pattern, feel free to email me at [email protected]
Join us in the 6-Day Kid Blanket Facebook Group
Video tutorials available at
http://tinyurl.com/6DayKidBlanket
This pattern is the intellectual property of Betty McKnit/Beth Elliott, and it is protected by copyright. Publishing corrections, translations, written or video tutorials, or variations of this pattern, online or elsewhere, without written permission from the owner is a violation of copyright.
The stitch pattern is “Vivid Chevrons” #110 from 200 Ripple Stitch Patterns by Jan Eaton.
Reprinted with permission from Quarto Publishing.
Thank you to Marian Faries D’Ambrosio for her tip about working the edge stitches from the back to the front to alleviate rolling.
Thank you to the many amazing crocheters of the 6-Day Kid Blanket Facebook Group, and elsewhere for all the love you have given this humble little pattern. Your work inspiring and your questions and feedback help to make this pattern easier to read and follow for others.
Disclaimer: This site contains affiliate links.
Stay in touch! Sign up for Betty’s Newsletter.